An intake manifold gasket sits between the inlet manifold and the cylinder head, and when that seal starts to leak the engine usually shows it quickly: rough idle, hesitation, lean running, coolant loss, or a warning light that refuses to stay quiet. This article explains what the seal actually does, how a failure behaves, how I would confirm it before replacing parts, and what a sensible UK repair budget looks like. I’ll also point out the faults that are commonly mistaken for this one, because that is where people waste the most money.
The seal is small, but the clues it leaves are usually obvious
- A leaking manifold seal often shows up as rough idle, poor fuel economy, hesitation, or misfire symptoms.
- If coolant passes through the manifold on your engine, the same fault can cause coolant loss, overheating, and white exhaust vapour.
- I would confirm it with scan data and a smoke test before buying parts.
- The part itself is usually cheap; labour is what drives the final bill.
- Do not keep driving if the engine is overheating or misfiring badly.
What the seal does and why a leak changes everything
The manifold’s job is to distribute air evenly to each cylinder. The seal between that manifold and the head keeps the intake tract airtight, and on some engines it also keeps coolant inside separate passages. Once that joint leaks, the ECU sees the wrong amount of air, the mixture goes out of balance, and the engine has to work around a fault it was never calibrated to tolerate.
I split the problem into two cases. A pure air leak is mainly a driveability fault: rough idle, stumbling, poor fuel economy, and occasional misfire codes. A leak that also opens a coolant passage is more serious because it can drop coolant level, introduce air into the cooling system, and push the engine towards overheating.
That difference matters because the next step is not always the same. A vacuum leak wants intake-side testing, while a coolant leak also calls for pressure testing the cooling system. From here, the symptoms usually tell you which direction to go.
The warning signs I would look for first
There are a few tell-tale clues, and I read them together rather than one by one. A rough idle on its own may be a hose, a throttle-body issue, or a sensor problem. Rough idle plus a lean code or hissing noise is much more suggestive of an intake leak.
| Symptom | What it often points to | Why it matters |
|---|---|---|
| Rough or hunting idle | Air sneaking past the seal | The ECU adds fuel to compensate, and the idle can become unstable. |
| Lean code or misfire | Unmetered air in the intake path | Often shows up at idle first, then becomes more obvious under load. |
| Coolant smell or dampness around the manifold | Seal or adjacent coolant joint leaking | Needs cooling-system inspection before the leak turns into overheating. |
| White steam from the exhaust after warm-up | Coolant entering the intake or combustion path | Stop and inspect, especially if the coolant level is dropping. |
| Poor fuel economy and hesitation | Incorrect air-fuel mix | This often appears before a major fault code is stored. |
I would not treat every symptom as proof on its own. Thin white vapour on a cold morning can be condensation, not a coolant leak. What changes the diagnosis is persistence, coolant loss, overheating, or a pattern that gets worse once the engine is hot.
One important distinction is worth keeping in mind: if the engine never routes coolant through the manifold, you will not get the classic coolant-loss symptoms. In that case, the fault is usually limited to air leakage and driveability. That is why the engine layout matters as much as the symptom list.
If the engine is misfiring, I would move quickly, because repeated misfires can overheat the catalytic converter and turn a small seal problem into a second repair.
How I would confirm the fault before replacing anything
When I diagnose this kind of problem, I start with the cheapest proof first. A scan tool tells me whether the ECU is correcting for excess air, and a smoke test shows me whether the intake tract is leaking where it should not. If coolant is involved, I add a pressure test before I touch the manifold bolts.
- Read fault codes and live fuel trims. Positive fuel trims often mean the ECU is adding fuel to compensate for unmetered air.
- Inspect all nearby hoses, the throttle-body gasket, PCV lines, and injector seals. These faults can imitate a manifold seal problem very closely.
- Use a smoke machine on the intake system. Smoke escaping around the manifold joint is far cleaner proof than spraying random fluid around a hot engine.
- Pressure test the cooling system if there is any coolant loss, sweet smell, or dampness around the manifold. That helps separate an air leak from a coolant leak.
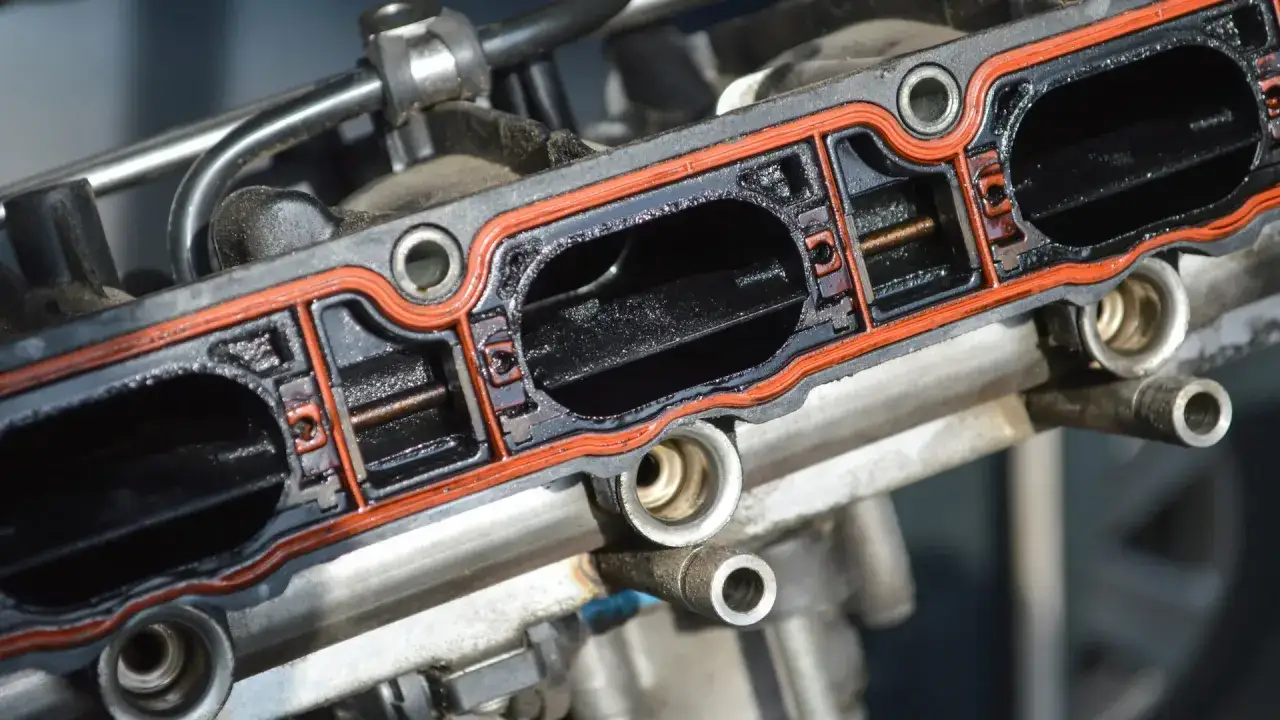
- Check for uneven torque, a warped mating face, or previous sealant residue if the manifold has already been removed.
I also keep the head gasket in mind, because the symptoms can overlap. But I do not jump there first unless the evidence is strong. A bad manifold seal is far more common than a blown head gasket, and the repair is usually much simpler when you catch it early.
The best diagnosis is the one that rules out the easy mistakes first. On many cars, the real fault is a split hose, a tired throttle-body seal, or a brittle PCV line sitting right next to the manifold.
Why these seals fail and which engines are less forgiving
Heat cycling is the usual killer. Every cold start, warm-up, and shutdown changes the shape of the manifold and head slightly, and after enough cycles the seal hardens, flattens, or splits. If the engine has ever overheated, that process speeds up because aluminium parts can move just enough to stop the joint sealing properly again.
A rough mileage guide is not very exciting, but it helps: many seals make it somewhere around 50,000 to 75,000 miles, yet I would trust engine temperature history and fitment quality more than the odometer.
- Age and mileage. Rubber and composite seals do not last forever, even on well-serviced engines.
- Poor installation. A contaminated mating face, missing dowel, or wrong torque order can make a new seal fail early.
- Plastic manifold distortion. Some modern manifolds flex or warp more than older alloy designs.
- Oil or coolant contamination. Fluids attack some seal materials and soften others.
- Vibration and movement. Worn engine mounts can let the engine rock enough to stress the joint.
- Previous repairs. A seal that was reused, pinched, or over-compressed rarely holds for long.
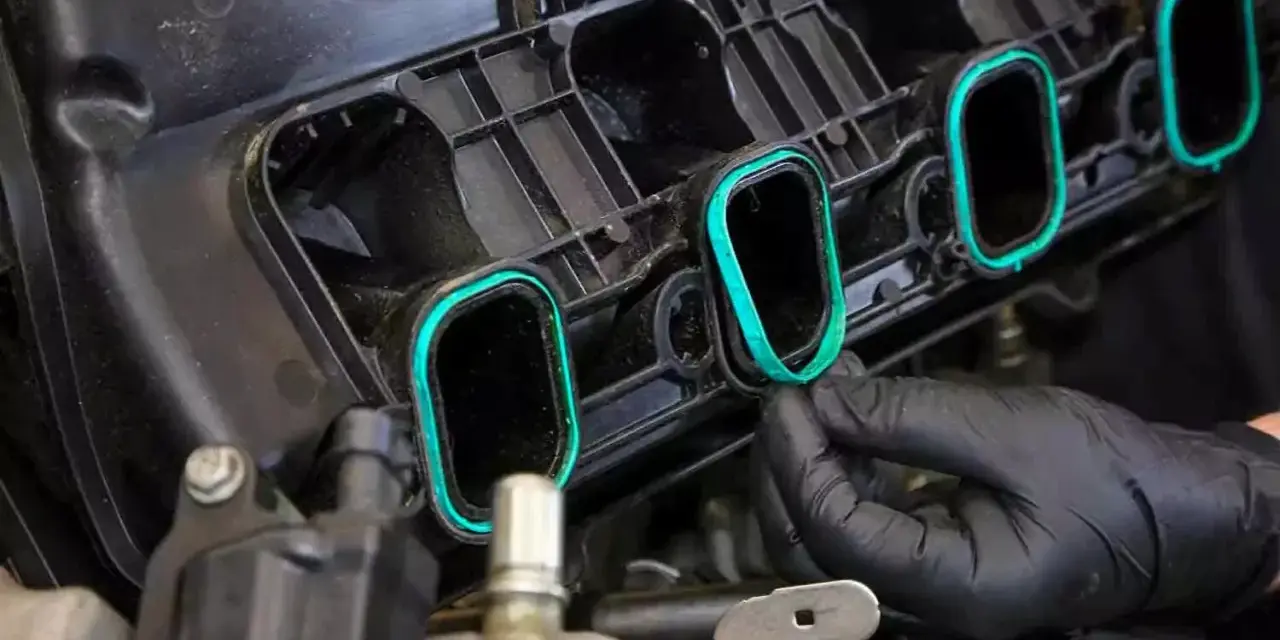
There is also a design point worth knowing. Some engines use a simple dry air seal, others use moulded rubber beads or a full gasket set that also seals coolant or vacuum passages. The more jobs the joint has to do, the more sensitive it becomes to small errors in fitting. That is why the same symptom can be trivial on one engine and awkward on another.
What replacement involves in practice
The basic job is straightforward on paper: remove access parts, lift the manifold, clean the mating faces, fit the new seal, torque everything correctly, and check for leaks. In the bay, it is never quite that clean, because the exact steps depend on where the throttle body, fuel rail, coolant hoses, and wiring loom sit.
- Depressurise the cooling system if coolant passes through the manifold.
- Remove the intake ducting, throttle body, and any brackets or pipes that block access.
- Unbolt the manifold in the correct sequence so it does not twist or crack.
- Clean the head and manifold faces carefully. Scratching a sealing surface is an easy way to create a repeat leak.
- Fit the new seal or gasket set. Do not reuse a flattened old seal.
- Refit everything to the maker’s torque sequence, then bleed the cooling system and clear any fault codes.
DIY can make sense if the engine bay is open, the manifold is easy to reach, and you have the service data plus a torque wrench. I would send the job to a garage if the manifold is buried under wiring, if fuel rail removal is involved, or if you already suspect a second fault such as a warped manifold or coolant-system problem. A rushed DIY repair usually costs more the second time because the diagnosis was wrong, not because the seal was expensive.
On some cars the sensible repair is not just one seal. If the throttle-body gasket, injector O-rings, or coolant pipe seals are disturbed during removal, they should be replaced at the same time rather than reused and hoped for the best.
What the repair usually costs in the UK
Parts are rarely the expensive part. AUTODOC UK lists these seals from £0.99 to £34, which is exactly why the bill usually reflects labour, access, and any extra seals that have to come off with the manifold.
| Item | Typical UK cost | What changes the price |
|---|---|---|
| Seal or gasket set | £0.99 to £34 | Brand, engine type, and whether you need a single seal or a full set. |
| Extra seals or hoses | £10 to £80+ | Needed if throttle-body seals, injector O-rings, or coolant pipes are disturbed. |
| Labour | Highly variable | Access is the main driver. A cramped engine bay can double the labour time. |
| Typical workshop total | About £150 to £450 on a straightforward car | Awkward layouts, cracked manifolds, or extra cooling-system work push it higher. |
That is the budget I would use for a simple repair. If the manifold has to come off twice because the first diagnosis was wrong, or if the job expands into coolant pipes, thermostats, injector seals, or a replacement manifold, the invoice rises quickly. On some engines, the repair stops being a seal job and becomes a strip-down.
The cheapest quote is not always the best value. I care more about whether the garage can prove the leak, replace the right seals, and bleed the cooling system properly than about shaving a few pounds off the headline number.
What I would check before paying for the repair
Before I sign off on the job, I want three clear answers: is it air, coolant, or both; is the manifold itself damaged; and have the nearby seals and hoses been inspected. That saves a lot of comeback work.
- Ask for evidence, not just a guess. A smoke test or pressure test is better than “it looks like the seal”.
- Confirm whether the manifold is reusable. Some cracks only show when the part is off the engine.
- Check the nearby thermostat housing, hoses, PCV lines, and injector seals. Those parts often leak in the same area.
- Make sure the quote includes new seals, the correct torque procedure, coolant bleed, and a post-repair road test.
- If the engine has been overheating, ask whether a deeper cooling-system fault is present before replacing the manifold seal alone.
If the fault is still only a vacuum leak, the repair is usually a clean, finite job. If it is leaking coolant as well, I treat it as more urgent because overheating changes the stakes fast. Either way, the right diagnosis matters more than the price of the seal itself, and that is the bit I would never rush.