Paint correction works best when you treat it as a progression, not a guess. The practical answer to whether to compound or polish first is that compounding comes first only when the paint actually needs that extra cut; polishing is the refining step that follows, or the only step if the defects are light enough. In the sections below, I break down the difference, the right order, the safest workflow, and the mistakes that leave a finish looking hazy instead of clean.
The short answer is simple, but the process depends on the paint
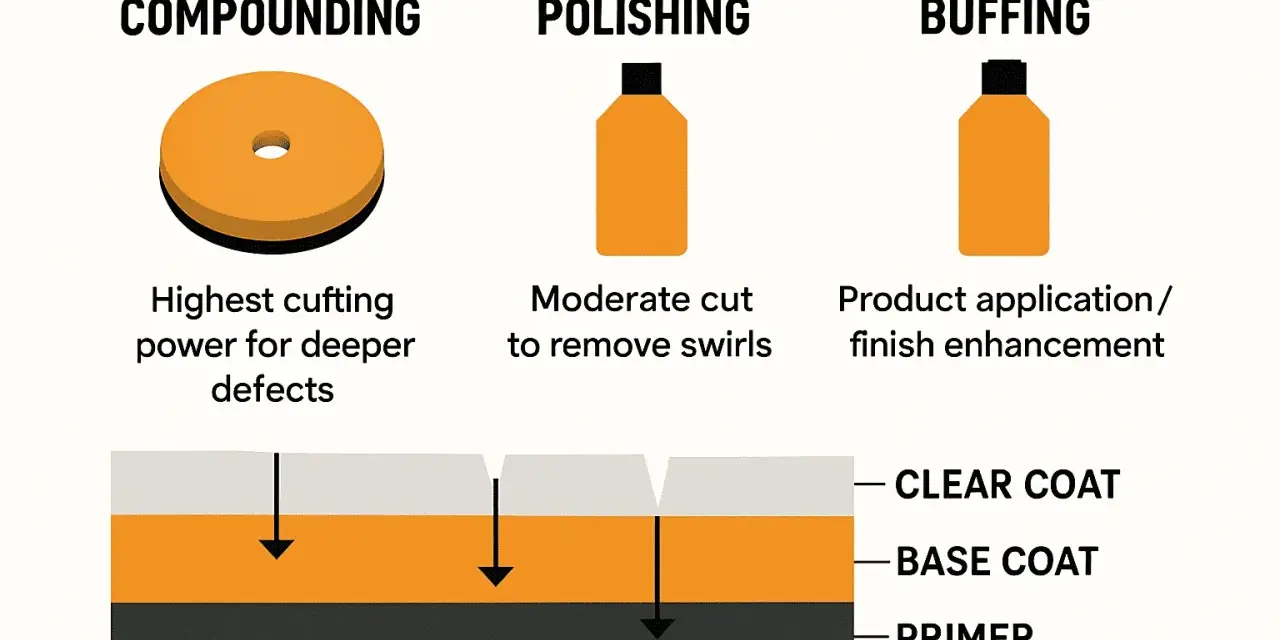
- Compound removes heavier defects such as deeper swirls, oxidation, and sanding marks.
- Polish refines the surface, removes light haze, and restores gloss.
- If a finishing polish clears the defect, skip compounding and save clear coat.
- If both stages are needed, use compound first and polish second.
- Always inspect under strong light before moving from one stage to the next.
Why the order matters in paint correction
Compound and polish are not interchangeable. A compound is the more aggressive product: it levels away a greater amount of paint to remove heavier defects. A polish is milder and is designed to refine the surface after correction, improving clarity and gloss. If you reverse the order on damaged paint, you usually waste time and still end up needing the heavier step anyway.
In plain terms, the paint tells you what it needs. If the finish only has light wash marring or a bit of dullness, polishing may be enough. If the panel has deeper swirls, oxidation, etching, or the tell-tale haze that follows poor previous work, you step up to compounding first, then finish with polish. I treat that as a least-aggressive-effective-method rule, not a shortcut.
| Step | What it does | Best used for | Main trade-off |
|---|---|---|---|
| Compound | Removes more paint to cut deeper defects | Heavier swirls, oxidation, water spots, sanding marks | Can leave haze or micromarring that must be refined |
| Polish | Refines the surface and boosts gloss | Light swirls, dull paint, finishing after compounding | May not remove defects that are too deep |
That difference is why the order matters so much: compounding creates correction, polishing creates finish. Once you see it that way, the process becomes much easier to plan, especially when you are deciding how aggressive to be on a particular panel.

A safe step-by-step workflow that works on real cars
I would not start by reaching for the most aggressive bottle on the shelf. A safer workflow begins with a clean, properly inspected surface and only escalates when the test spot proves it has to. On UK cars, that matters even more because damp panels, cool temperatures, and short dry windows can make residue harder to read and pads harder to control.
- Wash and decontaminate first. Remove dirt, tar, and bonded fallout before any machine work. If the paint feels rough after washing, clay it first. Clay does not remove swirls; it removes contamination above the surface.
- Work in strong light. Use daylight if you can, or a bright inspection lamp. Hidden defects are the main reason people think they are finished when they are not.
- Mask trim and edges. Rubber seals, textured plastic, and sharp body lines are where mistakes become expensive.
- Start with the least aggressive test spot. Try a finishing polish on a small section first. If it clears the defect, you are done with that panel.
- Step up to compound only if needed. If the lighter polish does not remove the marks, move to a compound on the same test area. On 3M's random orbital system, the guidance is speed 4-6 for compounding and 2-4 for polishing; with other machines, follow the polisher maker's range instead of copying those numbers blindly.
- Refine after compounding. Once the heavier defect is removed, switch back to a polish to restore clarity and remove any haze left by the compound.
- Inspect again before protection. 3M specifically advises checking between compounding and polishing because compound can hide remaining scratches and leave you thinking the panel is cleaner than it really is.
The important part is not speed, it is discipline. A well-run test spot saves product, time, and clear coat. It also stops you from compounding the whole car when only one panel actually needed that level of cut.
When polishing is enough on its own
Not every car needs compound. In fact, many daily drivers only need a light finishing polish, especially if the paint is already healthy and the main complaint is dullness rather than real damage. I would lean toward polish alone when the marks are shallow, the gloss is just muted, and the surface becomes visually cleaner after a basic wash and decontamination.
- Light swirl marks only visible in direct sunlight or under an inspection lamp.
- Dull, tired-looking paint that is otherwise smooth to the touch.
- Minor wash marring from regular maintenance, not deep scratches.
- Paint that responds well to a test spot with a finishing polish or mild all-in-one.
Meguiar's makes the same practical distinction in its guidance: if the finish feels rough, decontamination comes first, and if the paint has swirls, oxidation, or stains, a compound may be the better choice before waxing. That is a useful reminder that not every finish problem is a correction problem. Sometimes the right move is simply a cleaner polish, not a heavier abrasive.
The key limit here is depth. If you can catch a scratch with a fingernail, a polish alone is unlikely to remove it. At that point you either accept it, reduce it carefully with compounding, or risk chasing more cut than the panel is worth.
Common mistakes that create haze, swirls and wasted effort
Most bad correction jobs do not come from the wrong brand of product. They come from poor sequencing and overconfidence. I see the same errors repeatedly, and they are avoidable once you know what to watch for.
- Starting too aggressive. Going straight to compound on every car removes more clear coat than necessary and can leave a finish that still needs refining.
- Skipping the test spot. A test spot tells you the minimum correction needed. Without it, you are guessing.
- Using compound as the final step. A compounded panel may look better, but it often still has haze, especially on dark colours.
- Not wiping down between stages. Residue hides defects and makes you think the panel is finished when it is not.
- Working in poor light. Garage lighting flatters paint. Sunlight exposes it.
- Overworking edges and body lines. Paint is thinner there, and heat builds faster.
Those mistakes matter because they turn a sensible two-step process into a noisy, uneven one. If the paint looks slightly better but still lacks depth, I assume the finish needs refining, not just more product. That is usually the point where people either keep compounding too long or stop too early.
How to protect the finish after correction
Once the paint is corrected, it needs protection straight away. Bare corrected paint looks sharp, but it is also more exposed to contamination, water spotting, and wash-induced marring. For a car that lives outdoors in the UK, I usually think in terms of durability first and gloss second, because road salt, rain, and frequent washing punish weak protection quickly.
Your main options are straightforward. A wax gives a warm look and is easy to apply, but it is usually the shortest-lived option. A synthetic sealant is more durable and suits daily drivers well. A ceramic coating gives the longest service life, but only when the paint is properly prepped and you are willing to follow the maintenance it needs.
- Use a clean microfiber and a residue-free wipe-down before protection.
- Choose protection that matches how the car is used, not just how it looks in the garage.
- Avoid harsh automatic washes right after correction if you want the finish to stay crisp.
- Maintain with a pH-balanced shampoo and soft mitts rather than aggressive cleaners.
If you are preparing for a coating, I would be especially careful about leftover polish oils and dust. A corrected finish is only as good as the surface underneath the protection, and that last prep step is where many good results get weakened.
A simple rule for deciding the next move on each panel
My rule is easy enough to remember: test lightly, escalate only when necessary, and always finish with the least aggressive stage that still gives the right result. On a healthy panel, that might mean a polish and nothing else. On a neglected bonnet or rear quarter, it usually means compound first, then polish to bring the gloss back.
That is the real answer behind the compounding question. The job is not to use the harshest product that works; it is to use the mildest process that still fixes the defect. If you keep that in mind, you preserve clear coat, avoid unnecessary haze, and end up with a finish that looks properly corrected instead of merely rubbed over.