An AC pump replacement is rarely just a bolt-on job. A failed compressor can turn a comfortable car into one that blows warm air, mists the windows and starts making noises you do not want from the front of the engine. I treat this as a diagnosis-led repair because the compressor sits inside a system that also depends on refrigerant, oil, seals, the drier and the control electronics. This guide breaks down the warning signs, the proper replacement process, the UK cost picture and the small decisions that stop the same fault from coming back.
What matters most before you replace the compressor
- Not every air-con fault is a failed compressor; low gas, a leak or a sensor fault can create the same symptoms.
- A proper repair usually means flushing the system, fitting fresh O-rings and a new drier or accumulator, then vacuum-testing and recharging by weight.
- UK repair bills commonly sit around £400-£800 for compressor-related work, with wider system repairs often higher.
- If the compressor is noisy, seized or throwing belt-related symptoms, I would not keep driving it for long.
- The cheapest quote is often incomplete if it skips the support parts that protect the new compressor.
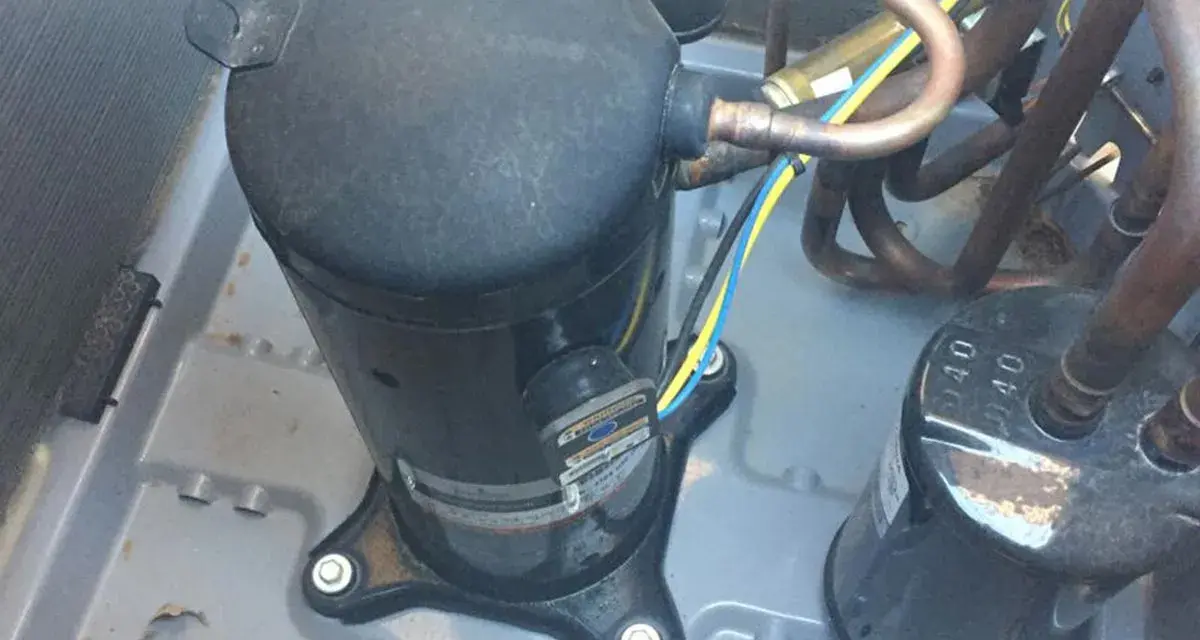
What the compressor does and why failure is easy to misread
The compressor is the heart of the air-conditioning circuit. It draws in low-pressure refrigerant vapour, compresses it, and sends it to the condenser so the heat can be dumped outside the car. If that stage fails, the cabin may never cool properly, but the real cause is not always obvious from the driver’s seat.
That is where people get caught out. A weak compressor, a leaking seal, a clogged expansion valve, a failed pressure sensor or simply too little refrigerant can all look similar at first. On many cars, especially older petrol and diesel models, the compressor is driven by the auxiliary belt, so a seized unit can also create belt noise or put extra strain on the drive system. Some hybrids and EVs use electrically driven compressors, which changes the diagnosis and the repair approach.
In practice, I separate “compressor failure” into a few different fault types: mechanical wear inside the unit, an electrical control fault, contamination in the refrigerant circuit, or a refrigerant loss that has stopped the compressor engaging. That distinction matters, because the next step is learning which signs point to the compressor itself rather than a leak or a simple loss of charge.
The signs that point to a compressor problem, not just a re-gas
I never trust one symptom on its own. Warm air can come from a low refrigerant charge, but it can also come from a compressor that is no longer pumping effectively. Noise can mean a bad bearing, a clutch issue or an internal failure. The pattern is what tells the story.
| Symptom | What it often suggests | What I check next |
|---|---|---|
| Air stays warm after a regas | Weak compressor, blocked system, or a leak that was never fixed | Pressure readings, leak test, compressor output |
| Clicking, squealing or grinding when A/C is switched on | Clutch, pulley bearing or seized compressor | Belt condition, pulley play, compressor resistance |
| Cooling works only sometimes | Electrical control fault, pressure switch issue, or compressor on its way out | Fuses, relays, sensor data and live pressures |
| Oil stains or greasy residue around the compressor | Shaft seal or hose leak | Visual inspection and UV dye if the system has it |
| One side of the system looks much hotter or colder than expected | Compressor not building pressure properly, or a metering fault | High-side/low-side readings and expansion valve behaviour |
What a proper compressor replacement should include
This is the point where shortcuts become expensive. MAHLE’s workshop guidance is clear that when the compressor is replaced, the system should be flushed and the non-flushable components renewed. That makes sense, because a failed compressor can leave metal particles, contaminated oil and moisture behind in the circuit.
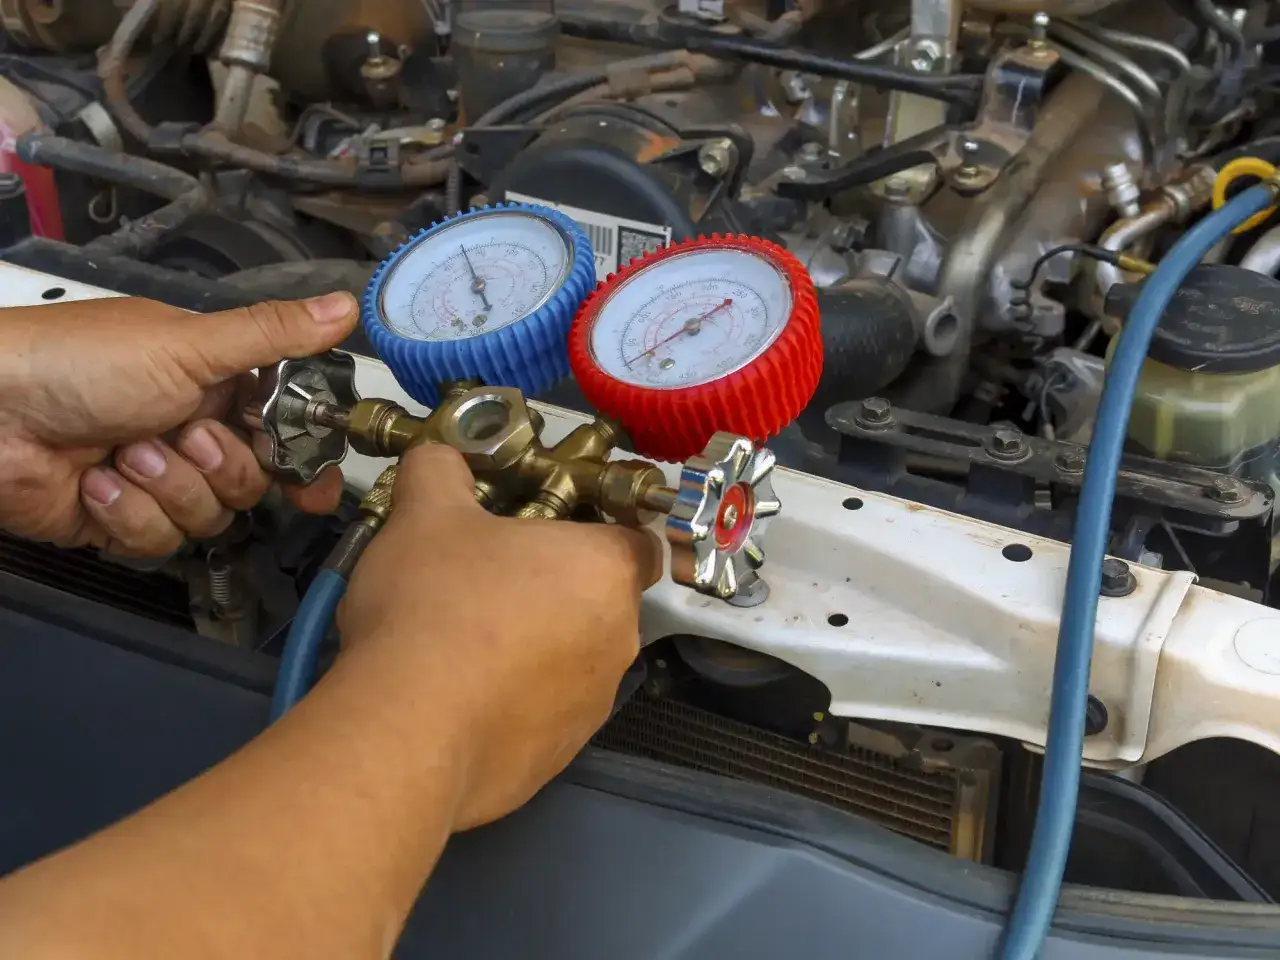
- Recover the refrigerant safely. The old charge must be removed with proper equipment before anything comes apart.
- Inspect for contamination. If the oil looks dark, gritty or metallic, I treat that as a sign of internal damage rather than a simple leak.
- Flush the system where appropriate. This clears debris from the lines and the parts that can be flushed.
- Replace one-time-use components. The receiver drier or accumulator removes moisture from the circuit, and once the system has been opened I expect fresh O-rings as well.
- Replace the expansion valve or orifice tube if contamination is suspected. This is the metering device that controls refrigerant flow into the evaporator, so a partial blockage can ruin the result.
- Fit the new compressor with the correct oil quantity. Too little oil kills it; too much can also reduce performance and create pressure issues.
- Check the auxiliary belt and tensioner. If the old compressor was noisy or seized, I want to know the belt drive has not been damaged too.
- Vacuum-test and recharge by weight. “Until it feels cold” is not a method. The exact refrigerant charge matters.
- Test vent temperature and pressure. Only then do I consider the job finished.
That workflow is why a compressor replacement is more than a parts swap. The surrounding components decide whether the new unit lasts or fails again in a few months. The next question is obvious: what should that level of work cost in the UK?
What it costs in the UK and what changes the bill
RAC data shows that compressor-related air-con repairs in the UK commonly land around £400-£800, while broader air-con replacement work can go from about £500 to over £1,000 depending on the vehicle and the extent of the damage. In my experience, that spread is driven less by the part itself and more by how much collateral work the system needs.
| Work item | Typical UK range | What is usually included |
|---|---|---|
| Diagnostic check | £60-£120 | Pressure test, electronic checks, leak finding |
| Re-gas only | £50-£150 | Recovery, vacuum, recharge if the system is otherwise healthy |
| Compressor-related repair | £400-£800 | Compressor, oil, labour, fresh seals, recharge |
| Wider system repair or replacement | £500-£1,000+ | Added parts, contamination clean-up, harder access, more labour |
Several things push the bill up fast. Access is a big one: some compressors are buried under intake parts, wheel-arch liners or front-end trim. Vehicle age matters too, because older systems may need extra seals or a condenser swap, while newer cars with modern refrigerant systems can be more expensive to service because the equipment and handling requirements are stricter. If the compressor failed mechanically and spread debris, the job becomes a much bigger clean-up than a simple replacement. A quote that does not include the drier, fresh oil and a proper recharge is not a complete quote in my book. That leads straight into the question of whether the car is still safe to use while you decide.
Whether you should keep driving, DIY, or book the garage
If the air-con has simply stopped cooling and there is no noise, no smell and no belt drama, the car is usually still drivable for short journeys. I would still book it quickly, because a failing compressor rarely improves by itself. The situation changes if the unit is noisy, the belt is squealing, or the compressor appears seized.
- Stop quickly if you hear grinding, screeching or a hard mechanical knocking when the A/C is requested.
- Switch the system off if the auxiliary belt starts slipping or smells hot.
- Do not keep cycling the button if the compressor is repeatedly trying and failing to engage.
- Avoid DIY refrigerant top-ups unless the car has already been properly evacuated and diagnosed by a professional.
I do not recommend a home swap for most drivers. The refrigerant has to be recovered legally and safely, the circuit needs to be evacuated and leak-checked, and the charge has to be set by weight. If the wrong oil is added, or moisture stays in the system, the new compressor can fail early. On a vehicle with a seized unit, I would rather see the car in a workshop than on the road, because the belt system can turn a compressor fault into a breakdown.
The repair choices that stop a repeat compressor failure
The expensive part of this job is not always the compressor. The expensive part is doing enough of the supporting work that the replacement actually lasts. That is where I think the best value lies.
When I am checking a quote, I want to see three things clearly: evidence of the fault, evidence of the system being cleaned properly, and evidence that the correct charge and oil are being used. If the garage cannot explain why the drier, seals or expansion valve are or are not being replaced, I treat that as a warning sign.
- Ask for the diagnosis, not just the part number. Pressure readings and leak evidence matter more than guesswork.
- Replace the drier or accumulator when the system has been opened. It is a moisture trap, and moisture is hard on compressor oil.
- Use the correct refrigerant oil and exact charge weight. This is where many rushed jobs go wrong.
- Run the air-con regularly, even in winter. RAC notes that it helps demist the windows and keeps the system lubricated.
- Avoid sealant cans. They may seem like a quick fix, but they can contaminate valves and make future servicing harder.
- Fix leaks early. A compressor often dies because the system has been undercharged or contaminated for too long.
My rule is simple: pay for the diagnosis that proves the compressor is truly at fault, then pay for the supporting parts that protect the new one. That is usually cheaper than buying the cheapest repair twice. If you keep the system lubricated, run it regularly and refuse shortcut fixes, the replacement has a much better chance of being the last one you need for a long time.