Rust on a car is rarely just a cosmetic issue. Once moisture gets under damaged paint or into seams, corrosion can spread quietly from a small bubble into a repair that needs sanding, welding, or even panel replacement. In this guide, I’ll show you how to recognise the early signs, decide whether it is safe to fix yourself, and understand when the job is better left to a bodyshop.
The fastest way to stop rust becoming a bigger repair
- Early corrosion usually starts where paint has been chipped, scratched, or worn thin.
- Small surface rust can often be treated at home, but bubbling paint and soft metal are warning signs.
- In the UK, rust becomes an MOT problem when it affects structural or prescribed areas.
- Winter salt, trapped mud, and blocked drain holes are some of the biggest accelerators.
- Fast action matters more than perfect cosmetics, because active rust keeps spreading under the paint.
Why corrosion starts in the first place
In practice, rust begins when bare steel meets oxygen and water. On a daily-driven car, that usually happens after a stone chip, a scuff, a poorly repaired scratch, or years of road spray wearing down the protective layers. In the UK, winter salt makes the problem worse because it keeps moisture on the metal for longer and speeds up corrosion once the coating has been breached.
I usually see the same pattern: a tiny paint defect near a wheel arch, sill, or door edge, then trapped grime holds damp against the panel, and the rust starts from underneath. That is why a car can look fine from five metres away and still have hidden corrosion starting in the seams, inside the arch liner, or behind a trim strip. The more exposed the underside and wheel areas are, the more attention they need.
It also helps to remember that rust is not only an age problem. A newer car that gets used on salted roads, parked outside, or driven through standing water can corrode faster than an older car that is washed, dried, and protected properly. Once the metal is exposed, the clock starts. The next question is how serious the damage is.

How to tell a minor spot from a structural problem
The first thing I look for is bubbling paint. That is often the earliest visible clue that corrosion is developing beneath the surface. From there, the difference between a small repair and a serious one comes down to how deep the rust has gone and whether the metal still feels firm.
| Type of corrosion | What it usually looks like | What it means | Best next step |
|---|---|---|---|
| Surface rust | Orange-brown staining, light roughness, no bubbling or holes | Rust has started on the top layer only | Clean, treat, prime, and repaint quickly |
| Scale rust | Flaking, pitting, scabby metal, paint lifting around the area | Rust has eaten into the panel, but the metal may still be sound | Remove loose material and assess whether the panel is still solid |
| Penetrating rust | Holes, soft spots, cracked seams, edges that crumble when pressed | The metal has lost strength | Bodyshop repair, welding, or panel replacement |
The areas I would inspect first are wheel arches, sills, door bottoms, boot seams, jacking points, suspension mounts, and the lower edges of doors and tailgates. If the rust is only on the outer skin, you may still have time. If the corrosion is in a load-bearing area, it stops being a detailing issue and becomes a safety issue. That is the point where repair method matters more than appearance.
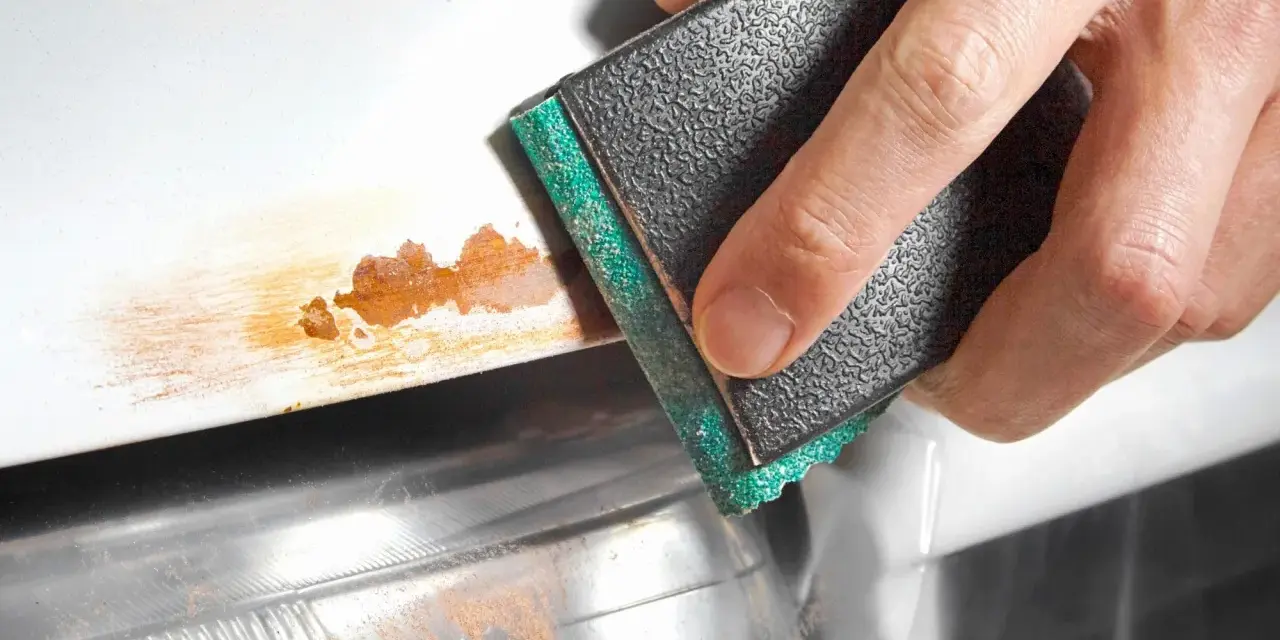
How to treat small rust before it spreads
For a small, localised patch on solid metal, a careful DIY repair can work well if you are realistic about the limits. I would only tackle this myself when the area is small, the surrounding metal is firm, and the rust has not spread into seams or structural parts. The goal is not to make the car look perfect immediately. The goal is to stop active corrosion and seal the metal properly.
The process I would follow
- Wash and dry the area thoroughly so you are not sanding grit into the panel.
- Remove loose paint and rust back to stable metal with sandpaper or an abrasive pad.
- Feather the edges so the repair blends smoothly into the surrounding finish.
- Use a rust converter only where the product is suitable and only after the loose rust has been removed.
- Apply primer, then colour coat, then clear coat or protective finish as needed.
- Let each layer cure properly before exposing it to water or road salt.
For a tiny chip, a DIY touch-up can cost roughly £15 to £60 in materials. A neat, localised repair often takes 1 to 3 hours of hands-on work, plus drying and curing time. That said, I would not trust a quick cosmetic cover-up on rusty metal. If you leave corrosion underneath, it almost always returns.
One mistake I see a lot is people painting over rusty metal because it looks acceptable for a few weeks. That usually fails because the rust is still active below the surface. Another common miss is failing to clean behind trim, lip edges, and seams, where moisture gets trapped. Once you have a clean, sealed repair, the next decision is whether the panel is beyond DIY.
When welding or panel replacement is the better move
If the area is soft, blistered, or already perforated, I would stop thinking in terms of sanding and paint. At that point, the right repair usually involves cutting back to clean metal, welding in new steel, and refinishing the area properly. That is especially true on sills, arches, floor edges, chassis-related sections, and anywhere suspension or seat belt mounts are nearby.
| Repair type | Typical UK cost | Best for | My take |
|---|---|---|---|
| DIY spot repair | £15 to £60 | Very small surface rust on sound metal | Good value only if the corrosion is early |
| Bodyshop spot repair | £100 to £300 | Minor visible rust on a single panel | Often the best balance of cost and finish |
| Arch or sill repair | £250 to £900 | Rust in common problem areas with some metal loss | Usually needs proper prep and blending |
| Structural welding or panel replacement | £500 to £1,500+ | Perforation, soft metal, or load-bearing corrosion | Safety work, not cosmetic work |
Those ranges vary by car, paint colour, region, and how much surrounding paint needs blending. A single rusty edge on an older hatchback is one thing; a corroded sill on a car with complex paint or hidden inner damage is another. If the rust has reached both the outer panel and the inner structure, the bill climbs quickly because the labour is in the stripping, cutting, welding, sealing, and repainting. That leads directly to the MOT side of the story.
What rust means for the UK MOT
UK MOT rules are not concerned with every speck of surface rust. They care about corrosion that weakens the vehicle or affects prescribed areas. In plain terms, if rust has created a hole, made the metal feel soft, or allowed a probe or finger pressure to break through, the car is heading toward a fail in the affected area. Corrosion on structural parts, load-bearing members, suspension mountings, or seat belt mounting areas is taken seriously.
That distinction matters because a car can have rusty arches and still pass, while a much less obvious patch near a mounting point can be enough to fail. I would treat any bubbling paint near sills, chassis rails, spring seats, or floor edges as a warning that deserves a proper inspection. Even if the tester only records an advisory for now, it is a signal that the problem is progressing.
There is also a practical safety angle here. Rust that looks cosmetic today can become a much bigger problem by the next test if water keeps getting in and the metal keeps thinning. If the corrosion is on a structural area, I would not wait for the annual MOT to tell me it has become serious. The inspection should happen before the metal loses strength.
How to keep rust from coming back
Prevention is where you save the most money. Once a panel has been repaired, the finish only lasts if the metal stays sealed and clean. On UK roads, that means washing off salt, keeping drains open, and protecting vulnerable areas before winter grime has time to sit on the car.
The habits that actually help
- Rinse the wheel arches and lower sills every 1 to 2 weeks in winter if you drive on salted roads.
- Wash the car after long motorway runs, coastal trips, or heavy rain when road film builds up fast.
- Check for blocked drain holes in doors, tailgates, sunroof channels, and boot lids.
- Inspect stone chips and edge damage monthly so you can seal them before moisture gets in.
- Use wax, sealant, or a dedicated protectant on exposed paint and lower panels a few times a year.
- On older cars, refresh cavity wax or underbody protection every 2 to 3 years, sooner if the car lives outside.
Detailing products are not magic, but they do matter when they are used on clean, dry metal and maintained properly. I prefer prevention that is boring but repeatable: wash, dry, inspect, seal, repeat. That approach is more effective than chasing occasional miracle products after the corrosion has already spread. The final piece is deciding what to fix first when the budget is limited.
The repairs I would prioritise first when money is tight
If you cannot do everything at once, start with anything that can affect structure, safety, or MOT outcome. That means sills, floor edges, jacking points, suspension mounts, and seat belt mounting areas come before an ugly patch on a cosmetic panel. A small hole in a structural area is always more urgent than a large patch of rust on a bolt-on trim section.
- Priority 1: Soft metal, holes, or rust near mounting points and load-bearing areas.
- Priority 2: Bubbling paint on sills, arches, and door bottoms where water is already getting in.
- Priority 3: Visible surface rust on panels that are still solid and easy to access.
- Priority 4: Cosmetic rust on removable parts or lower-risk trim pieces.
If I had to reduce the whole job to one rule, it would be this: deal with rust early, seal the metal properly, and never assume bubbling paint is only skin deep. That habit keeps a small blemish from turning into a welding job and gives you the best chance of keeping the car solid through another British winter.