The short answer to which jumper cable goes on first is the red positive clamp on the flat battery. From there, the rest of the sequence is about keeping the last connection away from the battery itself, so you reduce the chance of sparks and protect the car’s electrics. I’ll walk through the correct order, the small details that matter on modern UK cars, and the mistakes that turn a simple jump start into a bigger problem.
The safe connection order at a glance
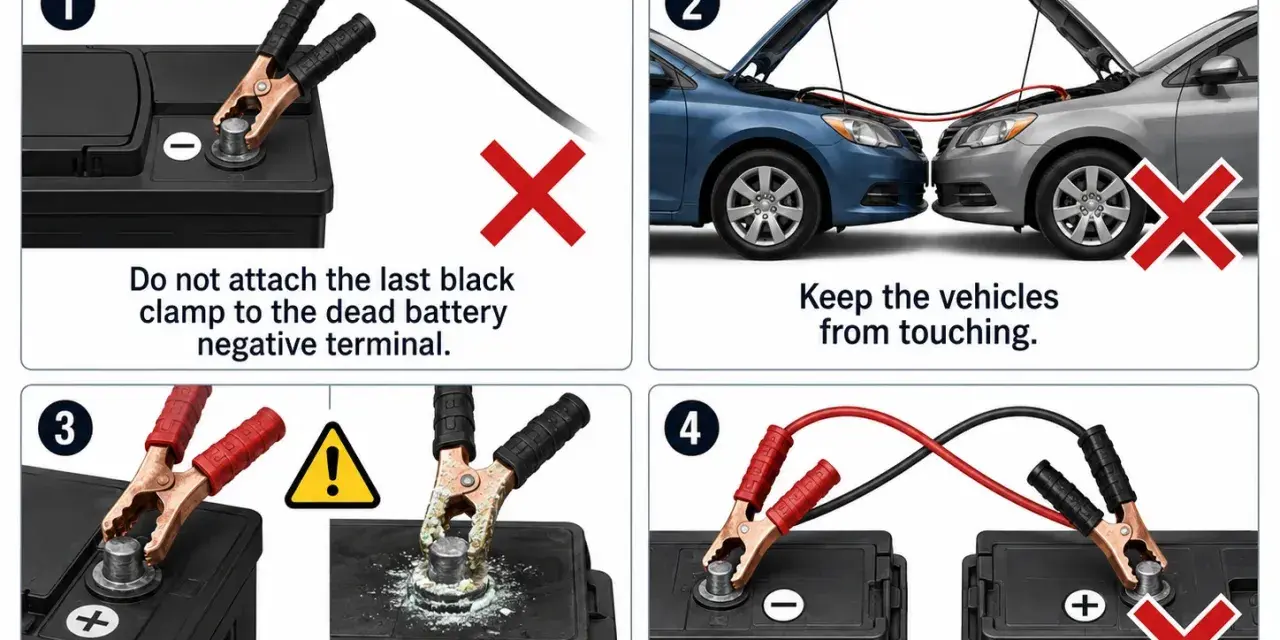
- First: red clamp to the positive terminal on the flat battery.
- Second: red clamp to the positive terminal on the donor battery.
- Third: black clamp to the donor battery’s negative terminal.
- Last: black clamp to a clean, unpainted earth point on the dead car.
- Do not let the clamps touch, and do not jump a damaged, leaking, or frozen battery.
- After it starts: remove the leads in reverse order and drive long enough to recharge the battery properly.
Why the first connection matters
I always tell drivers to think about jump leads in terms of where the final spark might happen. That is the real safety issue. The positive-to-positive connections are straightforward, but the last black clamp is where care matters most, because you want any tiny spark to happen away from the battery area.
That is why UK breakdown guidance from providers such as RAC and The AA points to the same basic routine: positive first, then the donor car’s negative, and finally an earth point on the car with the flat battery. It is a simple habit, but it prevents a lot of unnecessary risk. If you remember nothing else, remember this: the last clamp goes on metal, not on the flat battery’s negative post.
That safety logic becomes even more important once you actually start connecting the leads, so the next section breaks the process down in the order I would use at the roadside.

How I connect jump leads step by step
Before I touch the cables, I make sure both cars are switched off, the handbrakes are on, and the vehicles are not touching. On most cars, you are dealing with a 12V system, and I would not attempt a jump if the battery looks cracked, swollen, badly corroded, leaking, or frozen.
- Clip the red lead to the positive terminal on the flat battery.
- Attach the other red clamp to the positive terminal on the donor battery.
- Clip the black lead to the negative terminal on the donor battery.
- Attach the final black clamp to a solid, unpainted earth point on the dead car, usually on the engine block or chassis.
- Start the donor car and let it run for a few minutes.
- Try the flat car. If it does not start, wait a minute and try again, but do not crank for more than about 5 seconds at a time.
What I like about this sequence is that it is both logical and forgiving. The red leads are doing the obvious battery-to-battery transfer, while the final black clamp is kept away from the battery itself. If the engine starts, let it idle briefly or, better yet, drive gently for at least 30 minutes so the alternator can put some charge back into the battery.
Once that order is clear, the only real variation is whether you are using another car, a portable pack, or a vehicle with a hidden battery location.
When a booster pack or hidden battery changes the process
Some modern cars, especially those with stop-start systems, have the battery under the boot floor, under a seat, or tucked away behind trim. In those cases, I look for the manufacturer’s designated jump points rather than guessing at the battery posts. The same is true for many booster packs: the sequence is similar, but the pack instructions and the car handbook decide the exact connection point.
| Situation | First connection | Last connection | What I check first |
|---|---|---|---|
| Car to car jump | Red to the flat battery’s positive terminal | Black to an earth point on the dead car | Both cars are 12V and switched off |
| Portable jump pack | Red to the positive terminal or jump point | Black to unpainted metal ground | The pack is charged and stable |
| Battery in the boot or under a cover | Red to the marked positive jump point | Black to chassis earth | The handbook shows the correct jump location |
In practice, the hidden-battery case is where people get lost. My rule is simple: if the car gives you a dedicated jump terminal, use it. If it does not, do not improvise. The handbook is the right place to check, especially on newer vehicles with more sensitive electrical systems.
Once you know how the setup changes, the next job is avoiding the mistakes that cause most of the trouble in the first place.
The mistakes I see most often
The biggest errors are rarely technical. They are usually rushed, careless, or based on old advice that no longer fits modern cars. The ones I watch for most are easy to avoid:
- Connecting the black clamp to the flat battery’s negative terminal instead of to an earth point.
- Letting the red and black clamps touch while one or both are live.
- Forgetting that red is positive and black is negative.
- Trying to jump a damaged battery, especially one that is cracked, leaking, swollen, or frozen.
- Cranking too long instead of pausing and checking whether the problem is more serious than a flat battery.
- Assuming every car uses the same jump point, which is a bad assumption on newer UK models with stop-start systems.
The spark risk is the reason the last clamp belongs away from the battery, but the electrical risk is wider than that. If the battery is already weak, badly sulphated, or near the end of its life, a jump may work once and then fail again the next morning. That is not a cable-order problem; it is a battery health problem.
That leads into the part people skip too quickly: removing the leads correctly and checking whether the battery actually recovered.
How to disconnect and recharge properly
Once the engine is running, I disconnect the leads in the reverse order I fitted them. That means black off the earth point first, then black off the donor battery, then red off the donor battery, and finally red off the flat battery. Keep the clamps clear of belts, fans, and any moving parts while you do it.
After that, do not treat the battery as fully fixed. If the car needed a jump, it probably needs a proper recharge. A decent drive of around 30 minutes is a sensible minimum in normal conditions, but if the battery was deeply discharged, a charger is often better. I also pay attention to repeated jump starts: if a battery keeps needing help, it is usually time to have it tested rather than just boosted again.
One practical rule I use is this: if the car starts, then stalls again shortly afterwards, or the electrics look weak, I stop thinking about the jump leads and start thinking about the battery, alternator, or starter system instead.
That is the point where the smart answer is often not another jump, but a proper diagnosis.
When I would not try a jump start
There are a few situations where I would stop and call for help rather than forcing the issue. If the battery is visibly damaged, the terminals are heavily corroded, the car has a mixed-voltage setup, or the handbook gives special instructions for the charging system, I would not guess. The same caution applies if you are dealing with a hybrid or EV and are unsure whether you are looking at the low-voltage auxiliary battery or a different system entirely.
In the UK, roadside help is often the better option if you are stranded, the weather is poor, or you are not fully confident about the battery layout. A jump start is a useful roadside skill, but it is only useful when the battery and the vehicle are actually safe to work on. If the car has a battery issue that keeps returning, the right next step is usually a battery test, not another set of cables.
So the practical answer is simple: red to the flat battery first, then red to the donor battery, then black to the donor negative, and finish on a clean earth point away from the flat battery. If you follow that order carefully, you solve the main safety problem and give the car the best chance of starting cleanly.