Jump-starting is one of those roadside jobs where the order matters more than force. The question of which terminal to disconnect first has a straightforward answer: when you remove jumper cables, take the negative side off first; when you are disconnecting a battery itself, the negative terminal comes off first. That simple habit reduces the chance of short circuits, sparks, and avoidable damage to the charging system.
The practical rule to remember after a jump-start
- Remove the black lead first. On a jump-start, that means the earthed point on the flat car comes off before the donor battery.
- For a battery removal job, negative comes off first. Do not mix up battery-terminal advice with jump-lead advice.
- Keep the clamps apart. Let them touch each other or bodywork and you can create a spark or short.
- Follow the vehicle’s jump points. If the manual gives a remote earth point, use that instead of improvising.
- Repeat jump-starts need diagnosis. A weak battery, poor earth strap, or charging fault is usually the real issue.
Jumper cables and battery terminals are not the same job
The confusion starts because people use the word “terminal” for two different tasks. After a jump-start, you are usually removing clamps from jumper leads, not unbolting the battery from the car. The sequence is still based on the same principle, but the parts you touch are different.
In a battery removal job, I would always disconnect the negative terminal first. After a jump-start, I remove the negative side of the jump leads first, starting with the earthing point on the car that needed help. In UK cars, that still holds whether the battery sits under the bonnet, in the boot, or beneath a seat. The layout changes; the polarity rule does not.
Once that distinction is clear, the actual sequence is easy to follow.
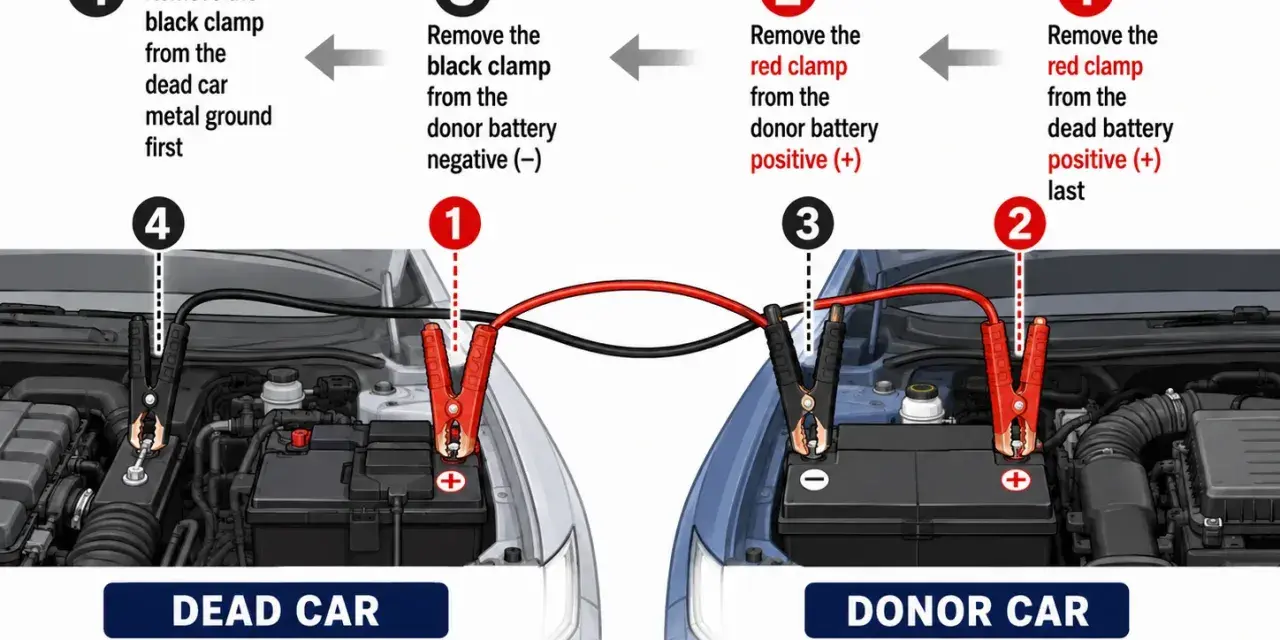
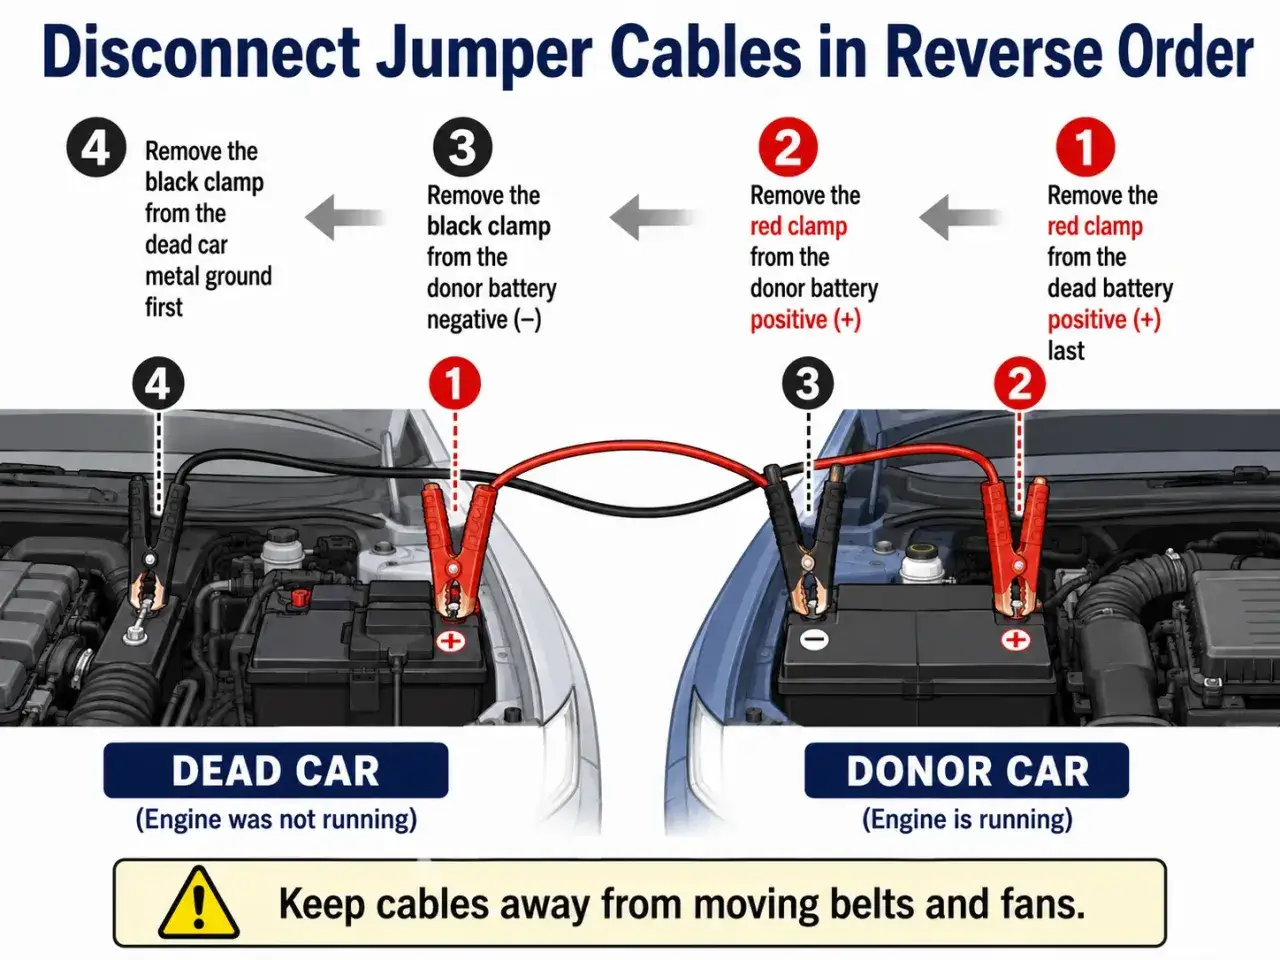
The safe disconnection sequence step by step
I use the same order every time because it keeps the live parts as controlled as possible while the circuit opens up. Follow the reverse order of the connection steps and do not rush the last two clips.
- Switch off both engines, remove the keys, and make sure neither car is moving.
- Take off the black clamp from the earthing point on the car that was flat.
- Remove the black clamp from the donor battery’s negative terminal.
- Remove the red clamp from the donor battery’s positive terminal.
- Remove the red clamp from the flat battery’s positive terminal.
- Separate the clamps immediately and lay the leads where they cannot touch each other, the bodywork, or moving parts.
That is the same reverse-order logic you will see in standard UK roadside guidance, including RAC and AA advice. The important part is not memorising a slogan; it is making sure the live red side is handled last and kept clear while you clear the black side first.
Why reverse order keeps the risk lower
The reason is simple: the negative side is usually bonded to the car body, so it is the safest side to break first. Once that return path is open, the chance of a loose clamp or tool completing a circuit through metalwork drops sharply. I treat that step as the safety break in the system.
| Habit | What it avoids |
|---|---|
| Remove the black lead first | Breaks the return path to the chassis before you handle the live side |
| Keep clamps apart | Stops a loose clip from completing a circuit or sparking |
| Leave the red lead until last | Reduces the chance of accidental shorting against metalwork |
It is also why the order matters when you are disconnecting a battery directly: negative off first, then positive. The physics is not complicated, but the consequences of getting casual with it are.
Common mistakes that cause sparks or confusion
Most jump-start mistakes are simple, rushed, and avoidable. I see the same handful over and over:
- Pulling the red lead first while the black lead is still attached.
- Letting the clamp jaws touch each other while one end is still live.
- Using a random bolt as an earth point instead of the approved jump point.
- Connecting directly to a battery that is cracked, swollen, leaking, or smells strongly of sulphur.
- Forgetting to set the handbrake and leave both cars in park or neutral.
If the battery looks physically damaged, stop there. A battery that is hot, swollen, leaking, or frozen is not a normal jump-start candidate, and no sequence is worth improvising around that. The same caution applies if the leads are clearly damaged or the clamps are loose and corroded.
When the usual rule changes on modern vehicles
The disconnection order does not really change on modern cars, but the access point often does. Many UK vehicles now hide the battery under the boot floor or a seat, and some provide dedicated jump points under the bonnet so you do not need to reach the battery directly. That is especially common on stop-start cars using AGM (absorbent glass mat) or EFB (enhanced flooded battery) units, where the battery type is designed for repeated cycling but still needs the right handling.
| Situation | What I do |
|---|---|
| Battery under the boot floor or seat | Use the approved jump points and still remove the negative side first |
| Stop-start, AGM, or EFB battery | Use the same order, but make sure the donor setup is suitable |
| Hybrid with a 12V system | Work only on the low-voltage jump points and follow the manual |
| Swollen, cracked, or leaking battery | Do not jump it at all |
That is the part many drivers miss: the battery location and architecture can change, but the polarity logic does not. If the car has a battery monitoring sensor, a remote earth point, or a manufacturer-approved jump post, use that setup rather than forcing the issue. Modern cars are less forgiving of guesswork, even when the cables themselves are nothing exotic.
What to do after the cables are off
Once the leads are clear, let the revived car run for a while and watch for warning lights, rough idle, or repeated clicking on the next start. If the engine dies again soon after, treat it as a charging or battery fault, not as a bad connection that simply needs another try. A battery that is already weak, especially one that has seen several winters and mostly short trips, often gives the same warning signs before it fails completely.
Look for slow cranking, dim lights, or a battery warning light on the dashboard. If the car needed a jump twice in a short period, I would want the battery and alternator tested rather than keep repeating the same roadside routine. That is the point where jump-starting stops being a fix and becomes a clue.
The roadside rule I keep in mind every time
My rule is simple: black off first, red off last, and if I am disconnecting the battery itself, negative terminal first. That one sequence covers most everyday cars in the UK and keeps the chance of a short low while I am handling live connections. It is a small habit, but it makes jump-starting feel controlled instead of improvised.
If the car keeps needing help, I stop treating it as a one-off flat battery and start looking for the real fault. That is usually the better repair, and it is almost always cheaper than ignoring the warning signs until the battery leaves you stranded again.