Cleaning bird poop off a car is one of those small jobs that can turn into paint damage if you rush it. The safe approach is simple: soften the deposit, lift it without dragging grit across the surface, and check whether the mark has already etched into the clear coat. In this article I cover the quickest safe removal method, what to do when the mess has dried on, which products are actually worth keeping in the boot, and how to make the finish easier to protect next time.
The safest approach is gentle, quick, and low-risk
- Fresh droppings should be softened first; never scrub them dry.
- A plush microfibre, quick detailer, or bird-dropping wipe is usually enough for small spots.
- Dried residue needs dwell time, not more pressure.
- If a pale mark remains after cleaning, it may be etched clear coat rather than loose dirt.
- Wax, sealant, or ceramic coating makes later clean-ups easier, but it does not make the car immune.
Why bird droppings are worth removing quickly
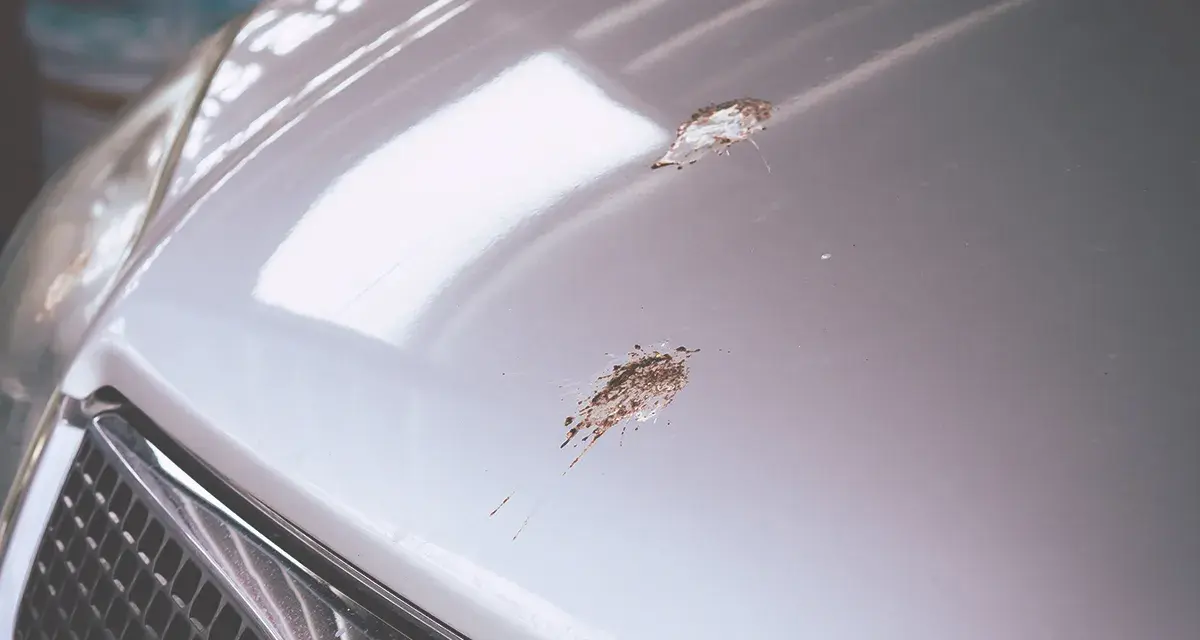
The mess itself is annoying, but the real issue is what happens when it sits in heat, sunlight, or even a bright cold day on a dark panel. Fresh droppings are soft enough to lift cleanly; once they dry, they become far more stubborn and much easier to grind into the paint by accident. In practice, I treat them as a same-day job, not something to leave until the next wash.
Autoglym has noted that the visible etching people often blame on “acid” is tied to the way the lacquer reacts around the dried deposit. Whatever the exact mechanism, the result is the same: the longer it stays on the car, the more likely you are to need polish rather than a simple wipe. That is why speed matters more than product hype.
If you park under trees, by lamp posts, or in busy car parks, the best habit is to deal with the spot before you drive far enough to bake it on. That leads straight into the safest removal method for fresh deposits.
The safest way to remove fresh droppings
For a fresh spot, I want the gentlest method that still gives enough slip to lift the mess cleanly. You do not need to attack it; you need to soften it, glide it off, and avoid putting grit back into the clear coat.
- Move the car into shade or let the panel cool. Hot paint makes residue dry faster and increases the chance of smearing.
- Wet the area thoroughly. Use clean water, a quick detailer, or a dedicated bird-dropping wipe. The goal is to break the bond before touching the paint.
- Let it sit briefly. Give the product 20 to 30 seconds of dwell time. Dwell time simply means the short period a cleaner stays on the surface so it can soften the residue.
- Lift, do not scrub. Place a clean plush microfibre over the spot, then lift it away with light pressure. If needed, blot once more with a fresh side of the cloth.
- Finish with a clean pass. Wipe the area lightly with a separate clean microfibre, then inspect it in daylight for any remaining haze or outline.
If you can still feel grit or see loose debris, stop and re-wet the area instead of forcing it. The same method works on glass, chrome, and most painted panels, but I would be more cautious on piano-black trim, satin finishes, or wrapped sections, where a gloss-safe cleaner may not be the right product. If the stain refuses to shift after two gentle passes, it is time to treat it as a dried mark rather than a fresh clean-up.
What to do when the stain has dried on
Dried residue needs patience, not force. The mistake I see most often is someone rubbing harder because the first pass did not work. That is usually how a clean-up becomes a faint scratch pattern or an etched patch that is harder to hide than the original mess.
- Re-soften the spot first. Spray it again with detailer or a bird-dropping cleaner and let it sit for a little longer than you would with a fresh deposit.
- Wipe with minimal pressure. If the cloth glides instead of dragging, you are on the right track.
- Check for a pale outline. If the droppings are gone but a cloudy mark remains, the problem may be etched into the clear coat rather than sitting on top of it.
- Move up to a light polish only after cleaning. A finishing polish on a foam applicator or soft pad can reduce light etching, but it is correction work, not cleaning.
- Stop before you overwork the area. If a hand polish does not improve the mark, the better fix may be machine polishing or professional detailing.
The tools and products that actually help
If I were building a small bird-dropping kit for the car, I would keep it simple and soft. The right kit is less about gadgets and more about having enough lubrication, enough clean cloths, and one product that can do the job without stripping protection off the paint.
| Option | Typical UK cost | Best for | My take |
|---|---|---|---|
| Bird-dropping wipes | About £9-£11 for a 10-pack | Glove-box cleanup, single spots, roadside use | The fastest grab-and-go option when you are away from home. |
| Quick detailer spray + plush microfibre | About £13-£30 for a basic kit | Fresh spots, light residue, regular use | Best all-round value if you want one kit that covers most situations. |
| Car shampoo and bucket | About £6-£15 | Several spots or a proper wash at home | Slower, but useful when the whole car needs attention anyway. |
| Bug and tar remover | About £7-£12 | Stubborn residue on glossy paint or glass | Useful, but I would test it first and avoid using it on sensitive trims unless the label says it is safe. |
| Finishing polish or mild compound | About £10-£25 | Light etching after the droppings are gone | Not a first-response cleaner; this is for marks that remain after gentle removal. |
Mistakes that scratch paint or spread the mess
The cleanup often goes wrong because the cloth or cleaner is wrong, not because the stain is unusually difficult. I would avoid these habits every time:
- Dry rubbing. This is the fastest way to grind grit into the clear coat.
- Using kitchen roll, tissues, or rough paper towels. They can leave fibres behind and do not give you enough glide.
- Scraping with a card, nail, or blade. Even if the residue looks hard, the paint underneath is softer than you think.
- Using household cleaners blindly. Strong detergents, bleach, or harsh DIY mixes can strip wax and dull trim.
- Reusing a dirty cloth. A cloth that has already picked up grit can turn one spot into a row of micro-scratches.
I also would not keep going just because “it is nearly off.” If the cloth starts to drag, add more liquid and soften the residue again. If you hear or feel grit, stop and re-wet. That small pause is usually what protects the finish.
The small habits that keep bird mess from becoming paint repair
The easiest way to deal with bird droppings is to make the next cleanup short. I get the best results from three habits: keep a protective layer on the paint, carry a tiny cleaning kit, and remove fresh deposits before they dry. Wax, sealant, and ceramic coating all make the surface slicker, so the mess releases more easily and leaves less trace behind.
For UK drivers, parking choice matters more than people expect. If I can avoid trees, wires, and the edge of a car park where birds gather, I do. If I cannot, I at least keep a bottle of quick detailer and two clean microfibres in the boot so I can handle a fresh spot before the sun or a long drive turns it into a stain. The rule I follow is simple: soften, lift, inspect, and protect. Do that, and bird droppings stay a nuisance rather than becoming a paint correction job.