A good paint correction job can transform tired exterior panels, but it only works when the goal is realistic: remove surface defects in the clear coat, then refine the finish until the gloss comes back cleanly. The difference between a proper cut and buff job and a rushed polish is not just shine; it is how much material you remove, how safely you do it, and whether the result will still look good after a few proper washes. That matters whether you are working on your own car or paying a detailer to do it for you.
The practical version in one glance
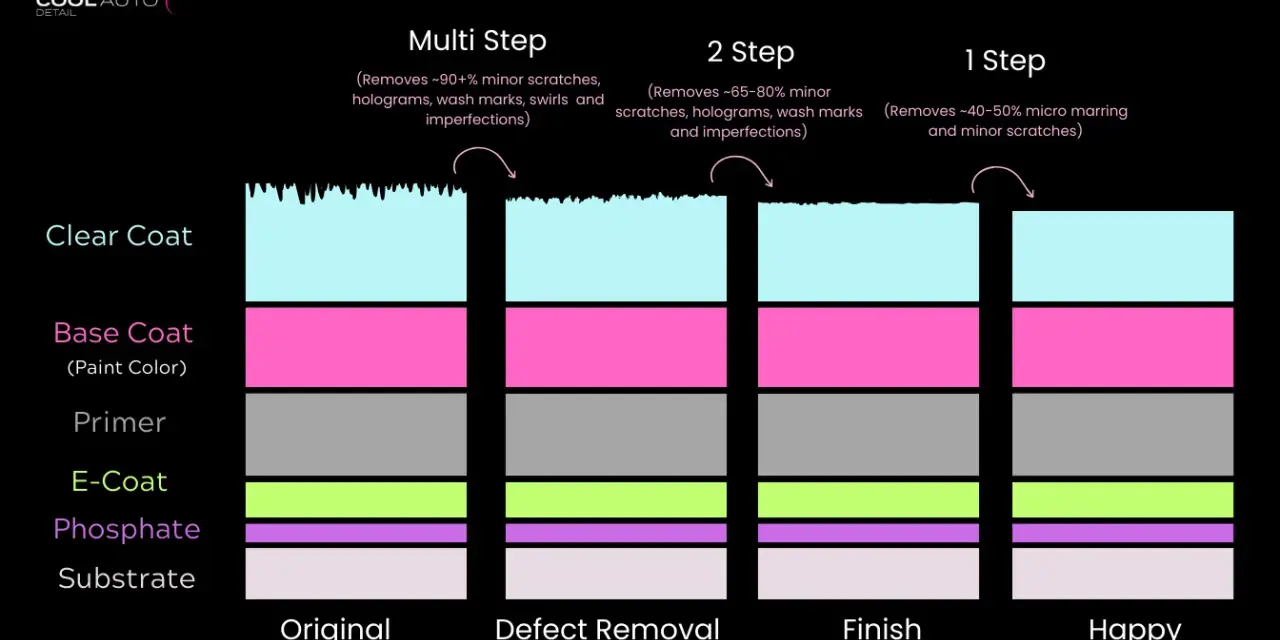
- This is paint correction, not a miracle repair: it improves swirls, haze, light scratches and oxidation, but it cannot fix damage that has gone through the clear coat.
- A dual-action polisher is the safest starting point for most owners; a rotary cuts faster, but it is less forgiving and can leave holograms if it is mishandled.
- The margin for error is small because modern clear coat is often only about 35-50 microns thick.
- A test spot tells you whether a light polish is enough or whether you need a stronger compound and pad.
- In the UK, DIY gear can start around £120-£300, while professional correction often moves from the low hundreds into four figures depending on condition and stage count.
- Protection after correction matters. Wax, sealant or ceramic coating helps preserve the finish you just restored.
What a proper cut and buff actually removes
I treat this process as controlled abrasion, not cosmetics for the sake of cosmetics. The cutting stage levels the tiny high spots around swirls, faint scratches, water spotting and oxidation, and the buffing stage refines the surface so the finish looks clear instead of hazy. On well-kept paint, that can be enough to make a car look dramatically newer without touching the original colour.
The limits matter just as much as the gains. If a scratch catches a fingernail, it is often too deep for safe machine correction. If the defect is through the clear coat and into the base coat, no amount of polishing will make it disappear permanently. That is why I always separate surface defects from damage that needs repainting; mixing those two up is where bad expectations start.
This is also why the process is popular on dark cars and glossy daily drivers. Those finishes show swirls first, so when the correction is right the visual payoff is obvious. Once you understand what can be removed safely, the next step is deciding how to work the panel without chasing damage.

How I would approach the job from wash to final polish
I never start with the machine. The car has to be clean enough that I am not dragging grit across the paint while I work. My usual sequence is simple: wash, decontaminate, inspect, test, correct, refine, protect. It sounds basic, but the discipline is what keeps the result consistent.
- Wash the car properly. A pre-wash, snow foam and two-bucket method reduce the chance of adding fresh marks before you begin.
- Remove bonded contamination. Iron fallout remover and, if needed, clay bar treatment help stop the pad from dragging contamination across the finish.
- Inspect under strong light. Swirls, trails, etched water spots and random scratches all look similar at a distance, but they behave differently under correction.
- Do a test spot. I always start with the least aggressive pad and polish that might solve the problem, then increase cut only if the result needs it.
- Work small sections. A panel divided into roughly 40 x 40 cm areas is easier to control than trying to attack the whole door in one go.
- Refine after compounding. The cutting stage may leave light haze; a finer polish and softer pad restore clarity and deepen the gloss.
- Finish with protection. Wax, sealant or a ceramic coating locks in the result and makes future washing easier.
The biggest mistake I see is people jumping straight to the aggressive pad because they want faster results. That usually creates more work later. A slower, staged approach is more reliable, and it leaves more clear coat on the car.
Once the sequence is right, the real question becomes which tools actually give you control rather than just speed.
The tools that make the biggest difference
The machine matters, but the pad and product combo matter just as much. A decent tool with the wrong pad is still the wrong setup. For most owners, a dual-action machine is the sensible default because it is more forgiving, more stable on curved panels and less likely to scorch edges. A rotary has its place on harder paint and heavy defects, but it demands better technique and more restraint.
| Tool | Why it matters | My practical rule |
|---|---|---|
| Dual-action polisher | Safer, easier to control and better for finishing work on most road cars | Use this first unless the paint is extremely hard or the defect is severe |
| Rotary polisher | Cuts fast and can handle tougher correction work | Use only if you understand heat, pad tilt and paint response |
| Cutting pad | Removes defects faster but can leave haze behind | Use for the correction stage, then refine with a softer pad |
| Finishing pad | Restores clarity and gloss after heavier cutting | Do not skip this step if you want a proper finish on darker colours |
| Paint thickness gauge | Shows how much film build you have to work with | Especially useful on used, repainted or unfamiliar cars |
| Masking tape | Protects trim, badges and sharp body lines | Always tape edges, plastic inserts and tight panel joins |
| Inspection light | Reveals defects that daylight can hide | Check the panel again after every stage, not just at the end |
A paint thickness gauge is not mandatory for every weekend detail, but it is cheap insurance on a modern car. Clear coat is commonly around 35-50 microns thick, which is not much room when you are correcting a panel that has already been polished before. I would rather stop early than discover a problem at the edge of a bonnet line.
That limited margin is exactly why risk management matters more than enthusiasm when the paint is thin, repainted or freshly finished.
Where the risk starts and when to stop
The process becomes risky when you confuse improvement with unlimited removal. Edges, body lines, repaired areas and plastic bumpers do not always have the same paint build as the flat centre of a panel. That is why I slow down around creases and avoid unnecessary pressure there. Heat builds quickly on high spots, and that is where burn-through usually starts.
There are a few clear stop signs I take seriously:
- The scratch still looks deep after a light test spot.
- The panel has been repainted and the history is unclear.
- The paint gauge shows uneven readings or unexpectedly low numbers.
- The finish is already soft and you can create haze with very little effort.
- The defect is on a sharp edge, badge recess or body line.
If the scratch is through the clear coat, or if the panel already shows signs of previous sanding or blending, the honest answer is usually to stop chasing perfection. At that point, further correction can do more harm than good. The right decision is not always to remove one more blemish; sometimes it is to protect what is left and leave repainting to a bodyshop.
That caution is also what separates a careful detailer from a fast one, and it is why price usually reflects not just the size of the car but the condition of the paint.
What it costs in the UK and whether DIY makes sense
In the UK market, I usually see stage 1 correction listed from roughly £295 to £799, while multi-stage work often starts around £995 and can move beyond £1,250 on larger or more neglected cars. Those numbers vary with vehicle size, paint condition, whether the car needs decontamination first, and whether the detailer is bundling in protection afterwards. For a proper one-day restoration, labour is the real cost driver.
| Option | Typical UK spend | Best for | Main trade-off |
|---|---|---|---|
| DIY starter kit | £120-£300 | Enthusiasts who want to learn and keep several cars looking tidy | Learning curve, time and a real chance of over-correcting if you rush |
| Single-stage correction | £295-£799 | Light to moderate swirls, oxidation and a noticeable gloss reset | Won’t fully cure deeper defects |
| Multi-stage correction | £995-£1,250+ | Heavier defects, darker paint and owners chasing a much sharper finish | Expensive and time-consuming, but the result is usually stronger |
Time is part of the equation too. A decent single-stage job can still take a full day, and a deeper correction can stretch into 12-18 hours depending on how much defect removal is needed. If the price sounds cheap for a full correction, I would ask what is being skipped. Usually, something is.
For a car that only needs light improvement, I think DIY makes sense. For a soft black finish, a rare car, or paint that you suspect has already been polished a few times, paying a competent detailer is often the safer choice. After that, the best way to protect the work is to maintain it properly.
How to keep the finish you just earned
The correction is only the first half of the story. If the wash routine stays aggressive, the swirls come back and the paint starts looking tired again. I always tell people that good aftercare is what turns a one-off transformation into a lasting result.
- Use a pH-neutral shampoo and a soft wash mitt.
- Dry with a plush microfibre towel or a blower, not an old chamois.
- Avoid automatic brush washes if you want the finish to stay sharp.
- Top the paint with a sealant or ceramic coating so contamination releases more easily.
- Inspect the car in strong light every few washes so small issues do not build up again.
If I had to leave one practical rule behind, it would be this: machine correction restores the gloss, but good washing preserves it. That is the difference between a finish that looks brilliant for a week and one that still looks strong months later.