Light damage on paint looks simple until you try to fix it and realise some marks sit in the clear coat while others cut deeper into the colour layer. Superficial scratches usually live in that top layer, which is why they can often be reduced with careful polishing instead of a repaint. In this guide I explain how to judge the depth, what I would try first, which products are actually useful, and when a professional repair makes more sense.
The quickest way to judge a light scratch and choose the right fix
- Most minor marks on modern paint are only in the clear coat and can often be improved at home.
- If the mark feels rough after washing, it may be contamination rather than true paint damage.
- A polish is for light clear-coat marks; a compound is for more stubborn surface defects.
- If the colour layer, primer, or metal is showing, polishing alone is the wrong tool.
- Good washing technique matters as much as the repair itself, because many new marks come from bad wash habits.
How to tell whether the damage is really in the clear coat
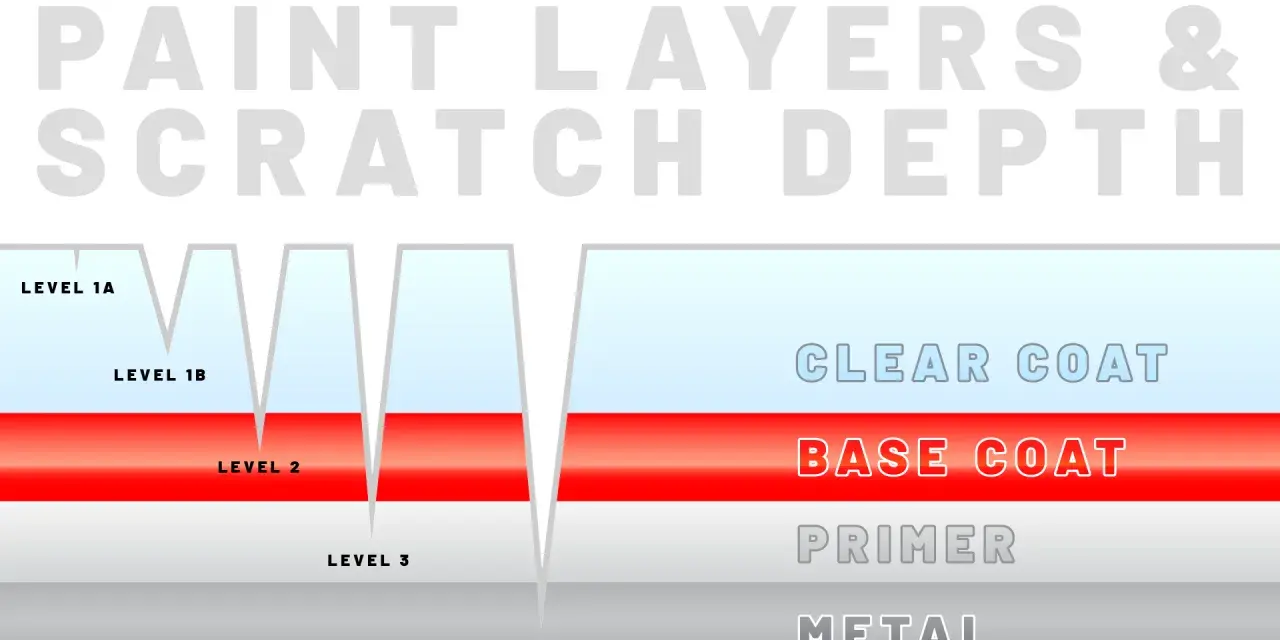
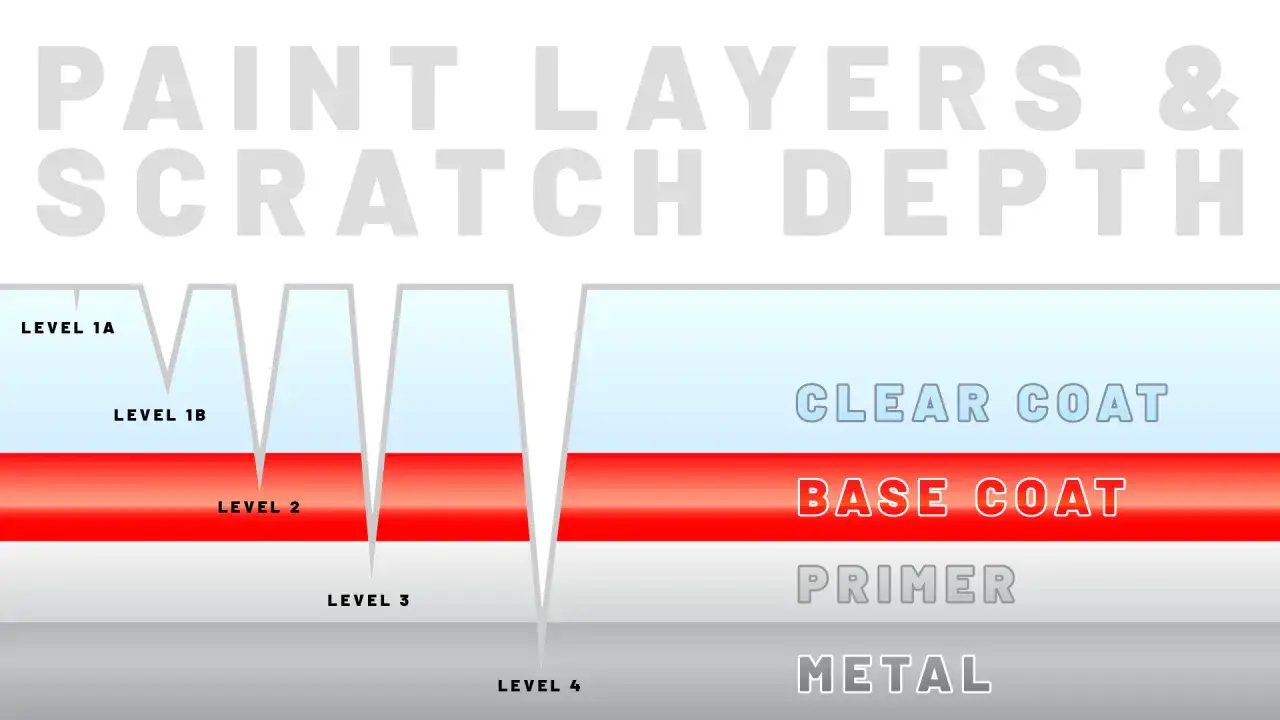
Before I reach for any product, I want to know what I am actually looking at. On most modern cars, the finish has a clear coat, a colour layer, and primer underneath; if the damage has only marked the clear coat, it is often fixable with gentle correction. If the colour has been removed, or the scratch is down to primer or metal, that is no longer a detailing job in the strict sense.
| What you see or feel | What it usually means | Best next step |
|---|---|---|
| Faint line that is hard to see unless the light hits it just right | Light clear-coat marking or swirl marring | Start with a finishing polish |
| Fingernail barely catches | Deeper clear-coat scratch, but not necessarily paint-through | Try a mild compound on a test spot |
| White, grey, or coloured line where the paint tone has changed | Colour layer damage, or paint transfer from another surface | Clean first, then decide between correction or touch-up |
| Primer, plastic, or bare metal showing | True through-paint damage | Use touch-up paint or book a body repair |
| Rough patch after washing, but no obvious line | Bonded contamination or etching | Decontaminate with clay before polishing |
I also keep an eye out for paint transfer. A white scuff on a dark car, or a coloured streak after brushing a post, is not always a deep scratch. Sometimes the other object has left material behind, and that can come off with careful cleaning instead of aggressive polishing. Once you know which layer is affected, choosing the right method becomes much simpler.
The safest way to remove light marks at home
When the damage looks shallow, I always start with the least aggressive approach. That protects the lacquer and makes it easier to see whether the mark is truly a scratch or just grime, tar, or paint transfer sitting on top of the finish. The goal is not to grind the panel until it looks new; the goal is to level the surrounding clear coat just enough to make the defect disappear.
- Wash the area properly first. Use a pH-neutral shampoo, a clean microfibre wash mitt, and plenty of lubrication. If the panel is dirty, every pass risks adding new marring.
- Dry and inspect in direct light. Daylight or a strong inspection lamp shows the truth better than indoor shadow. I want to see whether I am dealing with a scratch, a scuff, or simple contamination.
- Decontaminate if the surface feels rough. A clay bar or clay mitt can remove bonded fallout and tar that make the panel feel scratched when it is not. If the paint feels smooth after that, polishing becomes much easier.
- Test a finishing polish on a small spot. I prefer to start here because it is safer than jumping straight to a heavy compound. Work by hand on a soft applicator or with a dual-action machine on a light pad.
- Move up only if needed. If the mark is still visible, a light cutting compound may help. Use short passes, moderate pressure, and stop as soon as the defect improves. Repeated aggressive passes create more risk than value.
- Seal the area afterwards. A wax, sealant, or ceramic-friendly toppper helps protect the fresh finish and makes future washing easier.
A useful rule in practice is this: the more work it takes to improve the mark, the more carefully you should question whether DIY is still the right route. If the scratch is not improving after a sensible test spot, the next section matters more than the polish bottle.
When polishing stops being the right answer
Polishing is useful only while there is still enough clear coat to refine. If the damage has crossed into the colour layer, or worse, exposed primer or metal, no amount of buffing will put material back. At that point, you are choosing between a cosmetic disguise and a proper paint repair.
| Warning sign | Why it matters | What I would do |
|---|---|---|
| The scratch is visible even after a proper polish test | The defect is deeper than surface haze | Stop compounding and reassess depth |
| White or grey material is showing at the bottom of the line | Primer may be exposed | Use touch-up paint or a repair specialist |
| Metal shows through | Rust risk is now real | Repair promptly, not later |
| The mark is on a sharp edge, crease, or bumper corner | Lacquer is thinner there and easier to burn through | Avoid heavy machine correction |
| The panel already looks dull from previous polishing | There may not be much clear coat left to work with | Choose the least abrasive option or a repaint |
That is especially relevant on leased cars and newer vehicles, where a half-finished fix can stand out more than the original mark. In the UK, a rough ballpark is that a basic scratch-removal kit may cost about £10-£25, a better polish-and-pad setup around £40-£90, and a dual-action machine with pads and polish usually starts closer to £120. If the damage needs panel repair or smart repair work, the price rises quickly, but so does the quality of the finish.
Products and tools that actually help
The market is full of products that promise to erase scratches, but they do very different jobs. I separate them into three groups: products that remove material, products that fill defects, and products that protect the result. Knowing which category you are buying from saves a lot of disappointment.
| Product or tool | Best for | Strength | Limitation |
|---|---|---|---|
| Finishing polish | Very light marks, haze, and wash marring | Safest correction option | Not strong enough for deeper scratches |
| Cutting compound | Stubborn clear-coat defects | Removes more quickly | Can haze the paint if overused |
| Scratch remover pen or filler | Small isolated blemishes | Fast cosmetic improvement | Often hides more than it truly repairs |
| Clay bar or clay mitt | Bonded contamination and roughness | Improves surface feel before polishing | Does not fix a true scratch by itself |
| Dual-action polisher | Larger areas with consistent light damage | More even finish than hand work | Requires a bit of technique and restraint |
My rule is simple: if I want a lasting correction, I prefer a product that removes the defect cleanly rather than one that merely disguises it. Filler-heavy products can make a panel look better for a while, which is useful in a hurry, but they are not the same as true paint correction. For a daily driver, that distinction is usually more important than the branding on the bottle.
How to keep the same marks from coming back
The cheapest scratch repair is the one you never have to make again. Most repeat damage comes from the wash process, not from dramatic incidents. On UK roads, grit, salt, and road film make the lower doors, rear bumper corners, and wheel arch areas the first places I check for new marks.
- Use the two-bucket wash method. One bucket holds the shampoo solution, the other is for rinsing the mitt before it goes back to the paint.
- Choose a clean microfibre mitt and towel. Sponges trap grit more easily and can drag it across the panel.
- Wash from top to bottom. The lower panels carry the heaviest contamination, so I leave them for last.
- Dry with a plush towel or blower. Rubbing dry dust into paint is one of the fastest ways to add haze.
- Remove bird droppings and tree sap quickly. Letting them sit can leave etching that looks like a scratch but behaves more like chemical damage.
- Top up protection regularly. Wax or sealant makes the surface slicker, so dirt releases more easily and wash-induced marking drops.
If you want to push protection further, a ceramic coating can help, but I would not treat it as magic. It reduces friction and makes cleaning easier, yet it does not make the car scratch-proof. The real gain comes from better washing habits combined with a protected surface, because that is what keeps the clear coat looking sharp over time.
What I would do before reaching for a bigger repair
For a real-world car, my sequence is usually the same: wash properly, inspect in good light, try the gentlest correction that makes sense, and stop once the defect is gone. That sounds cautious because it is, but it is also the best way to avoid turning a small mark into a dull patch or a thinned section of lacquer.
When the line stays in the surface layer, patience is enough. When it has crossed into colour or primer, the honest answer is usually a proper paint repair rather than more polishing. That is the decision that keeps the exterior looking clean without wasting clear coat on a problem that no longer belongs to detailing alone.