A proper vinyl wrap starts long before the film touches the paint. The practical answer to what do you need to wrap a car is a mix of the right wrap film, the right prep products, and a small but specific set of tools that let the vinyl settle cleanly. Get those pieces right and the job becomes far more manageable; get them wrong and even good film will fight you on every panel.
The right film, the right prep, and the right tools do most of the work
- Cast vinyl is the safest choice for most full colour-change wraps because it conforms better around curves and recesses.
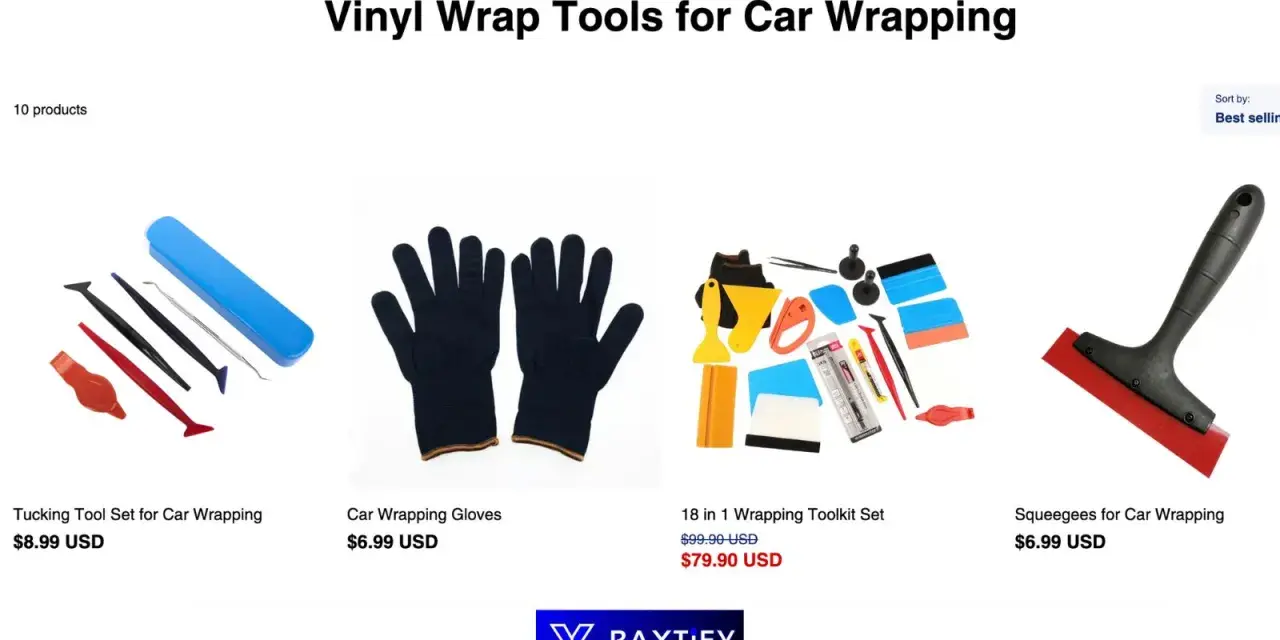
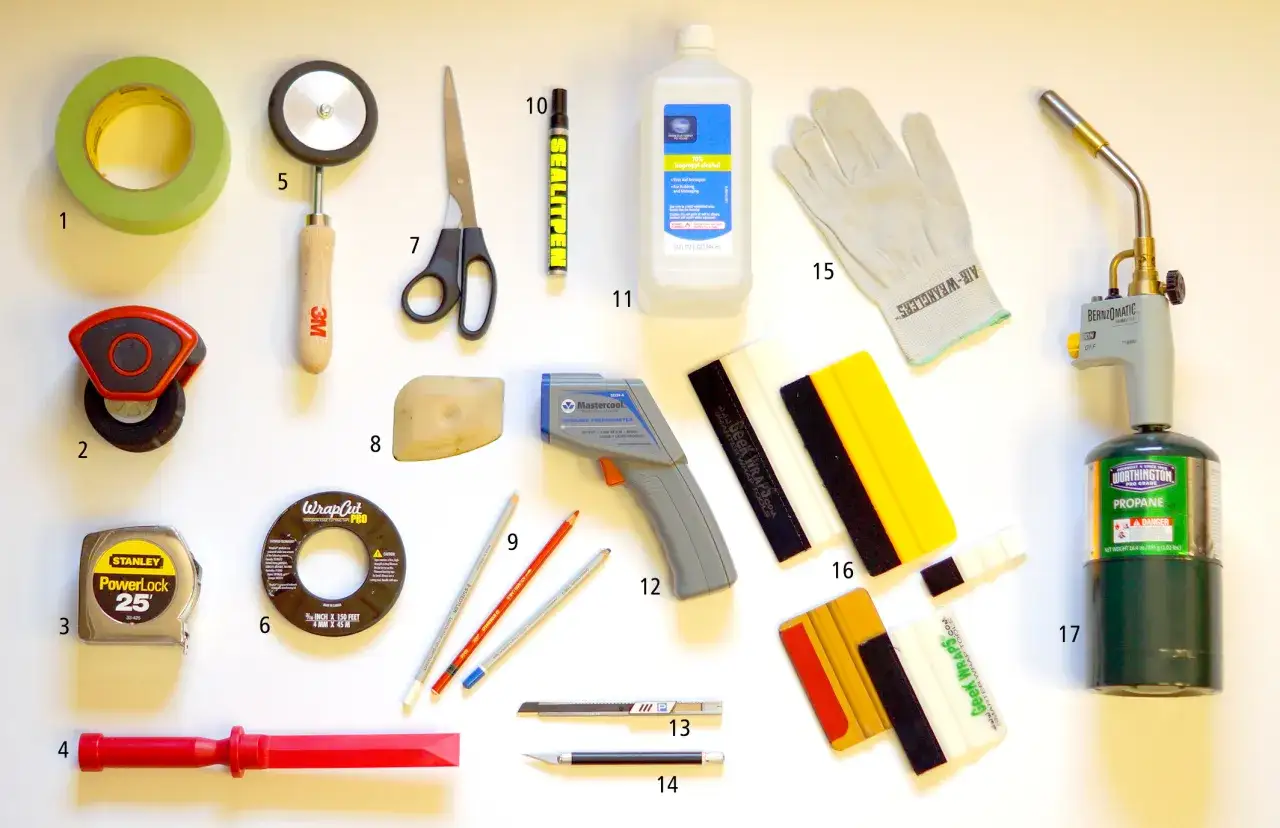
- You will want a felt-edge squeegee, heat gun, knifeless tape, sharp blades, wrap gloves, and measuring tools.
- Prep matters as much as the film: use detergent, lint-free cloths, clay bar, and an IPA-based final wipe.
- A wrap is easiest to install in a clean, dry indoor space with stable temperature, ideally around 16°C to 25°C.
- Do not wrap over wax, polish, heavy contamination, fresh paint that has not cured, or unknown ceramic coatings without checking compatibility.
The film itself is the first decision
If I had to narrow the whole job down to one purchase, I would start with the film. For most colour-change work, cast vinyl wrap film is the correct call because it is built to move around curved panels, mirror caps, bumpers, and door recesses without fighting you as much as cheaper calendared film. That matters more than colour or finish when you are doing a proper exterior wrap.
| Film type | Best use | Why it matters |
|---|---|---|
| Cast colour-change film | Full wraps, bumpers, mirrors, complex body lines | More conformable, better around curves, and usually the best balance of durability and installability |
| Calendared film | Flat panels, short-term graphics, budget jobs | Cheaper, but less forgiving on compound curves and more likely to shrink or lift over time |
| Gloss film with a protective layer | Shiny colour-change wraps | Helps reduce scratches while you install and peels off after the wrap is on |
| Matte, satin, or textured film | Style-focused colour changes | Hides some surface marks better, but still needs careful prep and clean handling |
| Printable wrap film plus overlaminate | Branding, custom graphics, mixed designs | Useful when you need logos or artwork rather than a simple solid colour |
Premium lines such as 3M 2080 or Avery Dennison Supreme Wrapping Film are popular for a reason: they are designed to be repositionable, with air-release features that make bubble control much easier. I also like that 3M’s 2080 line comes in 1.524 m widths, which helps when you want to cover a large section without seams.
Once the film choice is sensible, the next question is whether your toolkit is strong enough to install it cleanly rather than just stick it somewhere and hope.
The toolkit that keeps the vinyl under control
A car wrap does not need a giant workshop full of specialist gear, but it does need the right tools in the right places. If I were trimming this down to the essentials, I would build the kit around a good squeegee, a heat gun, knifeless tape, sharp blades, and a clean pair of wrap gloves. Those five items solve most of the practical problems you will hit.
| Tool | Why I would keep it in the kit | Typical UK budget range |
|---|---|---|
| Felt-edge squeegee | Puts pressure on the film without scratching it | £5-£25 |
| Heat gun | Softens vinyl so it can form around curves and edges | £60-£110 |
| Knifeless tape | Lets you cut film without dragging a blade across paint | About £45 for a 50 m roll |
| Snitty or 30° knife | Gives you controlled trimming on edges and tight details | £9-£15 |
| Wrap gloves | Reduce friction and help the film glide on compound shapes | £15-£25 |
| Magnets and masking tape | Hold the film in place while you line it up | £10-£30 combined |
| Measuring tape and marker | Helps you plan cuts and panel alignment | £5-£15 |
| Air-release tool or rivet brush | Useful for bubbles, recesses, and rivets on vans or older bodywork | £8-£20 |
I would not try a full wrap with a blunt craft knife and a kitchen-style scraper. That is how people end up tearing fresh film or scoring paint. Knifeless tape is especially worth it if you are new, because it gives you cleaner edges and removes some of the fear around cutting on the vehicle.
Tools keep the install under control, but they only work if the surface is actually ready. That is where most DIY jobs go wrong.
Prep materials matter more than most people expect
Prep is the stage people want to rush, and it is usually the stage that decides whether the wrap lasts. 3M recommends a clean, dry indoor workspace and a temperature window of 10°C to 38°C; in the UK, that usually means warming the space and letting the panel stabilise before you start, not halfway through the job. I like to treat prep as its own phase, not something I squeeze in between lunch and the first panel.
- Car shampoo and warm water to remove dirt before any solvent work.
- Clay bar to pull bonded contamination off the paint.
- IPA-based surface cleaner or a manufacturer-approved cleaner for the final wipe.
- Lint-free microfiber cloths so you do not leave fibres or smears behind.
- Compressed air or a blower for seals, door handles, panel gaps, and badges.
- Nitrile gloves and safety glasses when you are using cleaners or adhesive remover.
- Vacuum and tyre covers if you want to keep dust and rubber residue off the fresh film.
Avery Dennison is very clear that the paint surface needs to be free from wax, polish, oil, grease, oxidation, and ceramic-type coatings before application. That is the level of cleanliness I aim for as well. If the panel still feels slippery after cleaning, I clean it again. If the paint is fresh, I also check the cure time from the paint manufacturer instead of assuming it is ready just because it looks dry.
Once the prep is correct, the next decision is which film format actually suits the job you want to do.
Pick the wrap film for the job, not just the colour
People often buy a finish first and a film second. I would do the opposite. The shape of the vehicle and the purpose of the wrap should decide the material, because a glossy black wrap on a flat bonnet is a very different job from a satin metallic finish across a bumper, mirror, and side skirt.
| Situation | What I would choose | Reason |
|---|---|---|
| Full colour change on a normal car | High-quality cast film | Better conformity and fewer headaches around curves |
| Flat roof, bonnet, or boot lid | Cast or good calendared film | Less complex shaping, so the budget can be a little lower |
| Bumpers, mirrors, and deep recesses | Flexible cast film with good repositioning | These panels punish rigid film and sloppy technique |
| Printed branding or graphics | Printable wrap film plus overlaminate | Protects the print and gives the design a finished surface |
| Gloss finish with install protection | Film with a protective top layer | Helps reduce scratches while you are moving and post-heating the film |
For a lot of jobs, the real advantage is not the colour range but the adhesive behaviour. Repositionable adhesive and air-release channels buy you time, which is exactly what a beginner needs when lining up a bonnet or chasing a clean finish into a channel. If the film is too aggressive or too rigid, you spend more time fighting bubbles than shaping the wrap.
That is why the kit I would buy for a first attempt is not the same kit I would buy for a commercial fleet vehicle.
A realistic starter kit for a UK DIY wrap
If you are wrapping at home, I would think in tiers rather than trying to buy everything at once. A sensible starter kit for one person doing a roof, bonnet, or a first full wrap usually falls into three rough buckets.
| Tier | Rough UK spend | What it should cover |
|---|---|---|
| Lean starter kit | £100-£180 | Squeegee, gloves, knifeless tape, blades, cleaner, microfiber cloths |
| Serious DIY kit | £180-£350 | Everything above plus a better heat gun, magnets, measuring tools, clay bar, and extra blades |
| Near-pro kit | £350-£600+ | Premium film, better cutting tools, more consumables, and enough spare material to recover from mistakes |
In my experience, the most expensive mistake is buying cheap film and then paying for the same panel twice because the wrap creased, shrank, or tore during installation. If you are only doing a single panel, keep the kit lean. If you are doing a full car, invest in film quality first and tooling second. The film is what everybody sees, but the tooling is what lets the film look intentional instead of improvised.
There is one more part of the answer that usually saves more vinyl than any single tool: avoiding the mistakes that ruin the install before it is finished.
The mistakes that usually waste vinyl
Most failed wraps do not fail because the colour was wrong. They fail because the installer fought the material, skipped prep, or cut corners on the final stages. I see the same problems again and again, and they are all avoidable.
| Mistake | What usually happens | Better move |
|---|---|---|
| Wrapping over wax or polish | Adhesion fails early and the edges lift | Strip the panel fully and wipe it down before application |
| Working in a cold, damp garage | The film feels stiff, grabs unevenly, and takes longer to bond | Warm the space and keep the panel stable |
| Using blunt blades | Jagged cuts, torn film, and accidental paint damage | Use sharp 30° blades or knifeless tape |
| Stretching the vinyl too hard | Distortion and later shrinkage around edges | Use heat and controlled tension instead of force |
| Skipping post-heat on stressed areas | Lift points and memory return in corners or recesses | Post-heat stretched sections and edges properly |
| Using harsh solvent directly on the film | Finish dulls, mattes, or looks patchy | Follow the cleaner guidance for that film and test first |
If a panel feels contaminated, stop and clean it again. If the wrap starts to fight you at a corner, do not force it flat with more pressure. Reheat, relax the film, and reset the angle. That slower approach usually saves the material and gives you a cleaner edge, which is what matters in the end.
What I would buy first for a first-time install
If I were starting from zero and wanted the smallest kit that still gives me a realistic chance of a clean result, I would buy cast wrap film, a felt-edge squeegee, knifeless tape, a heat gun, a snitty or fresh 30° blades, wrap gloves, microfiber cloths, a clay bar, and an IPA-based cleaner. That combination covers the parts of the job that actually decide the finish: cleanliness, control, and safe trimming. It also keeps the learning curve honest, because you are not hiding poor technique behind expensive extras.
My rule is simple: start with one panel, not the whole car, and buy for the panel you can actually finish well. A bonnet, roof, or mirror cap teaches the same lessons as a full vehicle without burning through metres of film while you learn the rhythm of heat, pressure, and timing.