Choosing the right abrasive paper for car paint is less about buying the finest sheet and more about matching the grit to the layer you are working on. In this guide I break down when to use coarse, medium, and ultra-fine grades, how wet sanding differs from dry sanding, and how to finish a panel without cutting through the clear coat. I also cover the mistakes that ruin a repair and the small kit I would keep in a UK garage for real-world detailing jobs.
The safest approach is to match the grit to the layer you are correcting
- P80-P120 is for removing old paint or shaping filler, not for visible clear coat work.
- P180-P400 is the useful range for feathering repairs and levelling primer surfacer.
- P1500-P3000 is where most clear coat de-nibbing, orange peel refinement, and scratch finishing happens.
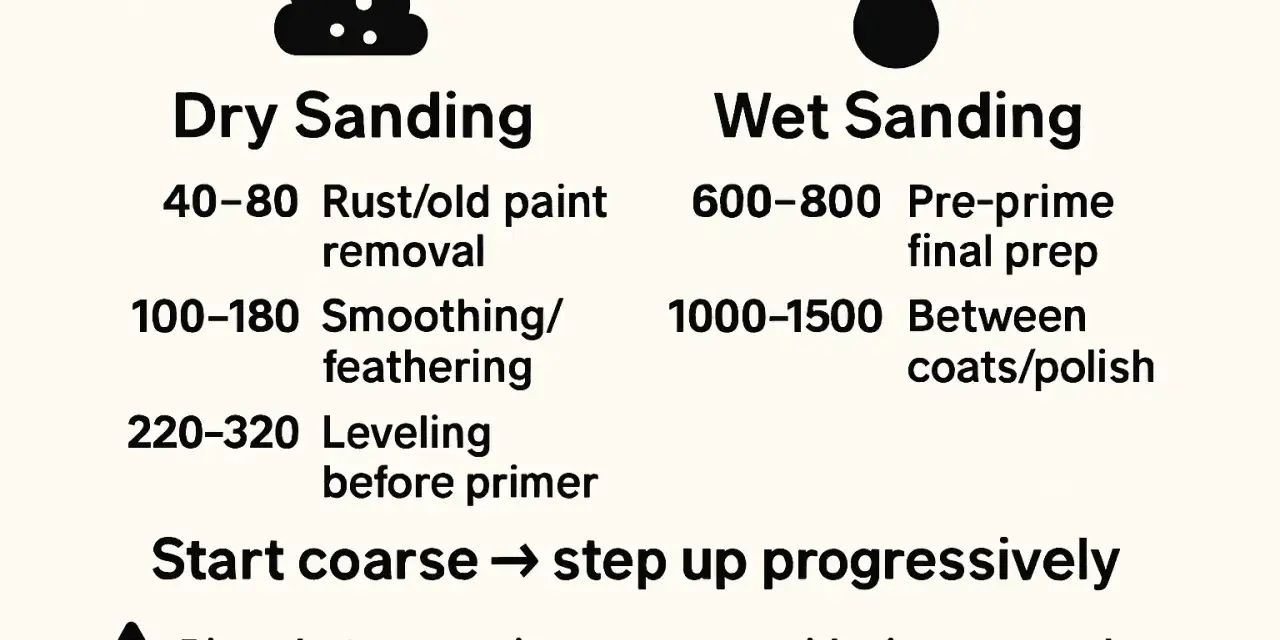
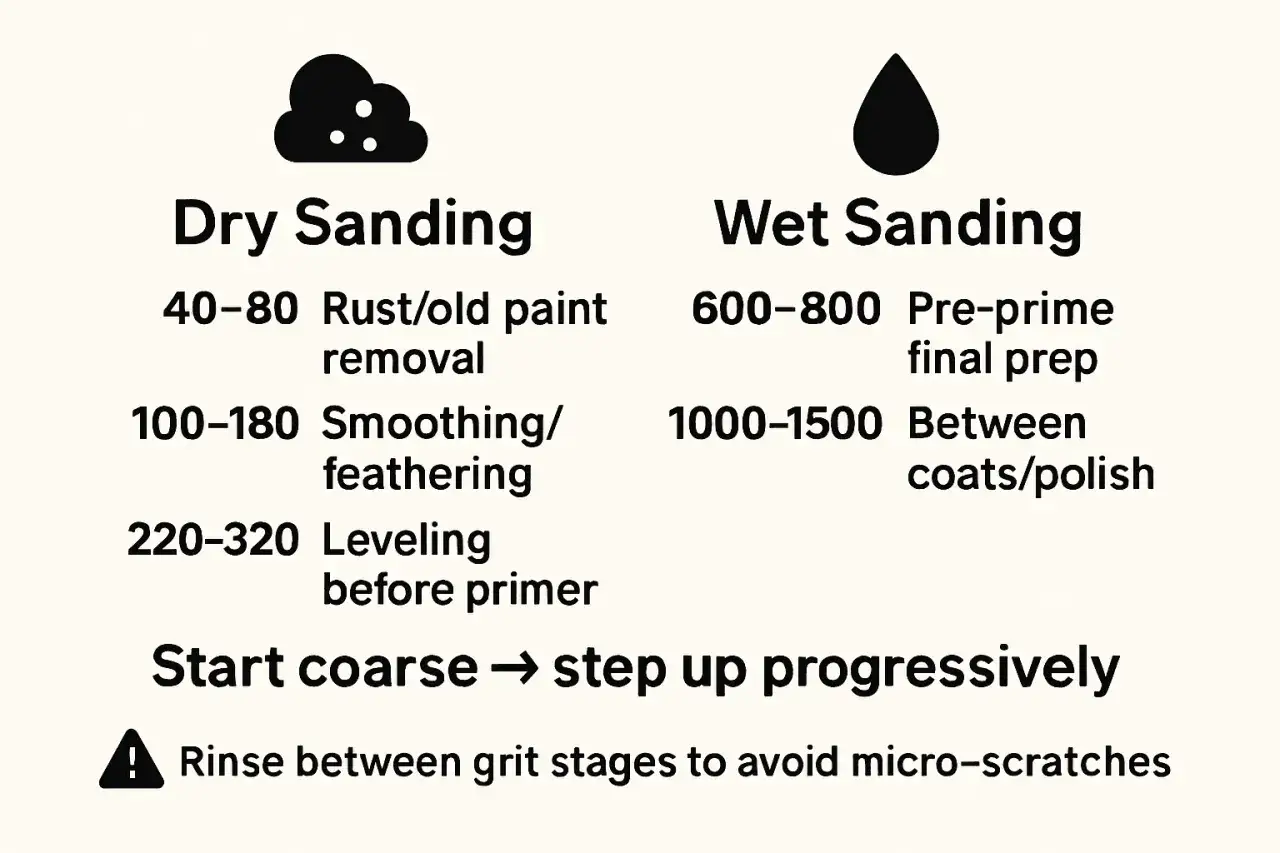
- Wet sanding is usually better for fine finishing; dry sanding is better when you need quicker shaping or heavier correction.
- The panel edges, body lines, and sharp creases are the highest-risk areas, so I treat them differently.
What abrasive paper actually does to car paint
I treat abrasive paper as a controlled flattening tool, not a shortcut. On car paint, the goal is usually to remove a tiny amount of material so the surface becomes more even, whether I am knocking down dust nibs, reducing orange peel, or preparing a repair for polish. That is why the right grit matters more than brand name or backing style.
Clear coat is the layer you usually touch
On a finished car, the clear coat is normally the layer you sand first. It protects the colour coat underneath, and it is also the layer that shows light texture, isolated scratches, and contamination. If I can correct the defect in the clear coat, I avoid disturbing the colour layer altogether, which is exactly what you want for exterior detailing.
Read Also: Paint Correction Guide - Restore Your Car's Finish
Thickness matters more than shine
Shine can hide a surprising amount, but it does not give you extra paint thickness. Once a surface has been machine polished several times, or the panel has already had previous repairs, I become more conservative. The practical rule is simple: if you are close to the colour coat or primer, sanding stops being a cosmetic choice and starts becoming a repair decision. That is the point where the next grit choice has to be deliberate.
Once you see sanding as a thickness-management problem rather than a polish replacement, the question becomes which grit is appropriate for each job.
Which grit to use for each stage of the job
In the UK, I prefer to think in P-grits because that is the common FEPA marking on wet-and-dry sheets. The ranges below are working ranges, not rigid rules, because modern clear coats vary in hardness and some OEM finishes are noticeably tougher than older systems.
| Job | Typical grit range | What it is for | Main risk |
|---|---|---|---|
| Removing old paint or shaping body filler | P80-P120 | Fast material removal when the panel is already in repair mode | Deep scratches that take time to refine |
| Feathering a repair edge | P180-P240 | Smoothing the transition between old finish and repair area | Creating a ridge if you sand too narrowly |
| Primer surfacer levelling | P280-P400 | Removing guide coat, pinholes, and minor texture before topcoat | Breaking through on edges or body lines |
| Clear coat de-nibbing and light orange peel reduction | P1500-P2000 | Flattening tiny dust nibs and texture before polishing | Cutting through the clear coat if pressure is too heavy |
| Final scratch refinement before compound | P2500-P3000 | Making the sanding marks fine enough to polish out cleanly | Stopping too early and leaving visible haze |
For most light correction work, I start finer than people expect. P2000 or P3000 is often enough for a tiny dust nib, a small touch-up edge, or a faint patch of orange peel. If I need to remove more than that, I step down carefully and then refine back up in stages rather than jumping straight to a coarse sheet. That stepped approach is slower, but it keeps the finish predictable.
The next question is whether to sand wet or dry, because that changes both the cut and the level of control.
Wet sanding vs dry sanding on modern finishes
Wet sanding uses water, or a light lubricating solution, to float away residue and keep the abrasive cutting evenly. Dry sanding removes material faster in some stages, but it also creates dust, clogs more easily, and is less forgiving on delicate paint. For clear coat finishing, I usually favour wet sanding because it gives me better feedback and less chance of leaving harsh scratches.
- Wet sanding is best for fine work on clear coat, defect refinement, and final levelling before polishing.
- Dry sanding is better for filler, primer, and heavier shaping where speed matters more than a near-finish surface.
- Wet-and-dry paper is the most versatile option for a UK home garage because it handles both modes if the product allows it.
- Lubrication and cleanliness matter more than the paper itself; a dirty sheet can leave random marks that are harder to read.
There are two limits I always keep in mind. First, fresh paint must be allowed to cure properly; sanding too early can smear, clog, or even cause swelling in the finish. Second, curves and sharp edges are easier to damage when the surface is wet, because you can lose track of how much material you are removing. I would rather stop, dry the area, and inspect it under a good light than keep sanding blindly.
Once you know which grit and method suit the job, the real skill is applying them without creating new problems.
How I would sand a painted panel without creating new damage
On a good day, this is less about force and more about control. I want the abrasive to cut evenly, the panel to stay flat, and the repair to remain repairable if I need to polish it afterwards. The steps below are the ones I would use for a typical light correction or a small refinishing task.
- Wash and decontaminate first. Dirt, tar, and bonded contamination can turn a fine sheet into a scratch machine very quickly.
- Mask the risky areas. I protect sharp body lines, panel edges, badges, textured plastic, and adjacent trim before I start.
- Use a guide coat when levelling. A guide coat is a contrasting mist that shows high and low spots, so I can see whether the panel is actually flat.
- Sand with a block whenever the surface is flat. Hand pressure from fingertips creates dips; a block spreads the load and keeps the shape consistent.
- Work in a crosshatch pattern. I change direction between passes so I can read the scratch pattern and avoid digging a trench in one line.
- Refine before polishing. If I finish at P1500, I do not expect compound alone to erase the marks. I step up to P2000 or P3000 first.
On curved panels, I use a softer interface pad so the abrasive follows the shape instead of biting into it. That matters on bumpers, arches, and bonnet edges, where the panel is rarely as flat as it looks under a workshop light. If the finish starts to show a colour change, I stop immediately and reassess rather than trying to save time by pushing through it.
Once the technique is right, the biggest threats are the avoidable mistakes that catch even experienced DIY detailers out.
The mistakes that turn a small correction into a respray
Most sanding problems come from overconfidence, not bad equipment. I see the same failures repeatedly: starting too coarse, skipping refinement steps, and treating edges like flat panel centres. Those mistakes are easy to avoid once you know where the risk sits.
- Using a grit that is too coarse. It feels efficient for five minutes and then wastes time in polishing or, worse, repairing the damage.
- Sanding with fingertips on a flat panel. That creates grooves and uneven pressure, especially on softer clear coats.
- Ignoring panel edges and body lines. Paint is thinnest there, so they should be treated with the lightest touch, or not sanded at all.
- Skipping the refinement steps. Coarse scratches that are not stepped down properly will show up again as haze, even after compounding.
- Working on a dirty surface. One trapped grain of grit can leave a mark that looks like a deep scratch.
- Chasing a defect too long. If a scratch or texture issue is still obvious after sensible sanding, the problem may be depth, not polishability.
One practical test I use is this: if the defect is still visible after I have moved up to a fine grit and cleaned the panel, I stop and reconsider. That is usually the point where a touch-up, a primer step, or a bodyshop repair is the smarter move. From here, the best next step is to build a small kit that matches the kind of work most drivers actually do.
The small kit that covers most driveway corrections
If I were buying a realistic kit for UK exterior detailing, I would not overbuy. A small spread of grits handles far more jobs than a giant box of overlapping sheets, and it keeps you honest about where a task should stop.
- P1500, P2000, and P3000 wet-and-dry sheets for clear coat refinement and touch-up levelling.
- A small firm sanding block for flat panels and a softer interface pad for curves.
- A spray bottle with clean water and a drop of car shampoo for lubrication during wet sanding.
- Guide coat for primer work, so low spots and pinholes are visible before topcoating.
- Microfibre towels, a finishing compound, and a foam pad for the polish stage after sanding.
For most enthusiasts, that kit covers the common jobs: a tiny stone-chip levelled after cure, a dust nib removed from fresh clear coat, or a small patch of orange peel reduced before machine polishing. If you are working on a panel that already has thin paint, hard edges, or uncertain previous repairs, I would stay conservative and use finer grits first. That approach gives you a better finish, a lower risk of burn-through, and more control over the final result.
The cleanest rule I use is simple: choose the finest grit that still does the job, then refine step by step until the scratches are easy to polish out. For most paint-safe detailing work, that means staying in the P1500-P3000 range and only going coarser when you are genuinely in repair territory. If a panel edge, a body line, or a previous repaint makes you hesitate, that hesitation is useful information, and it usually means the safe answer is to slow down or hand the job to a bodyshop.